The first time I tried to take a photo at night, the results were a disaster. My subject was dark and what I could see was blurry. But I didn’t give up. I knew there was a way to take pictures in the dark. I discovered long-exposure photography and changed my camera settings. What I found was that the night sky was not as dark as I thought.
In this article, I’ll detail the camera settings that will help you create well-exposed images at night. I’ll give you the basics of long-exposure photography. Whether you want to photograph the moon or the Milky Way, I’ll show you what you need to make your nighttime photos a success.
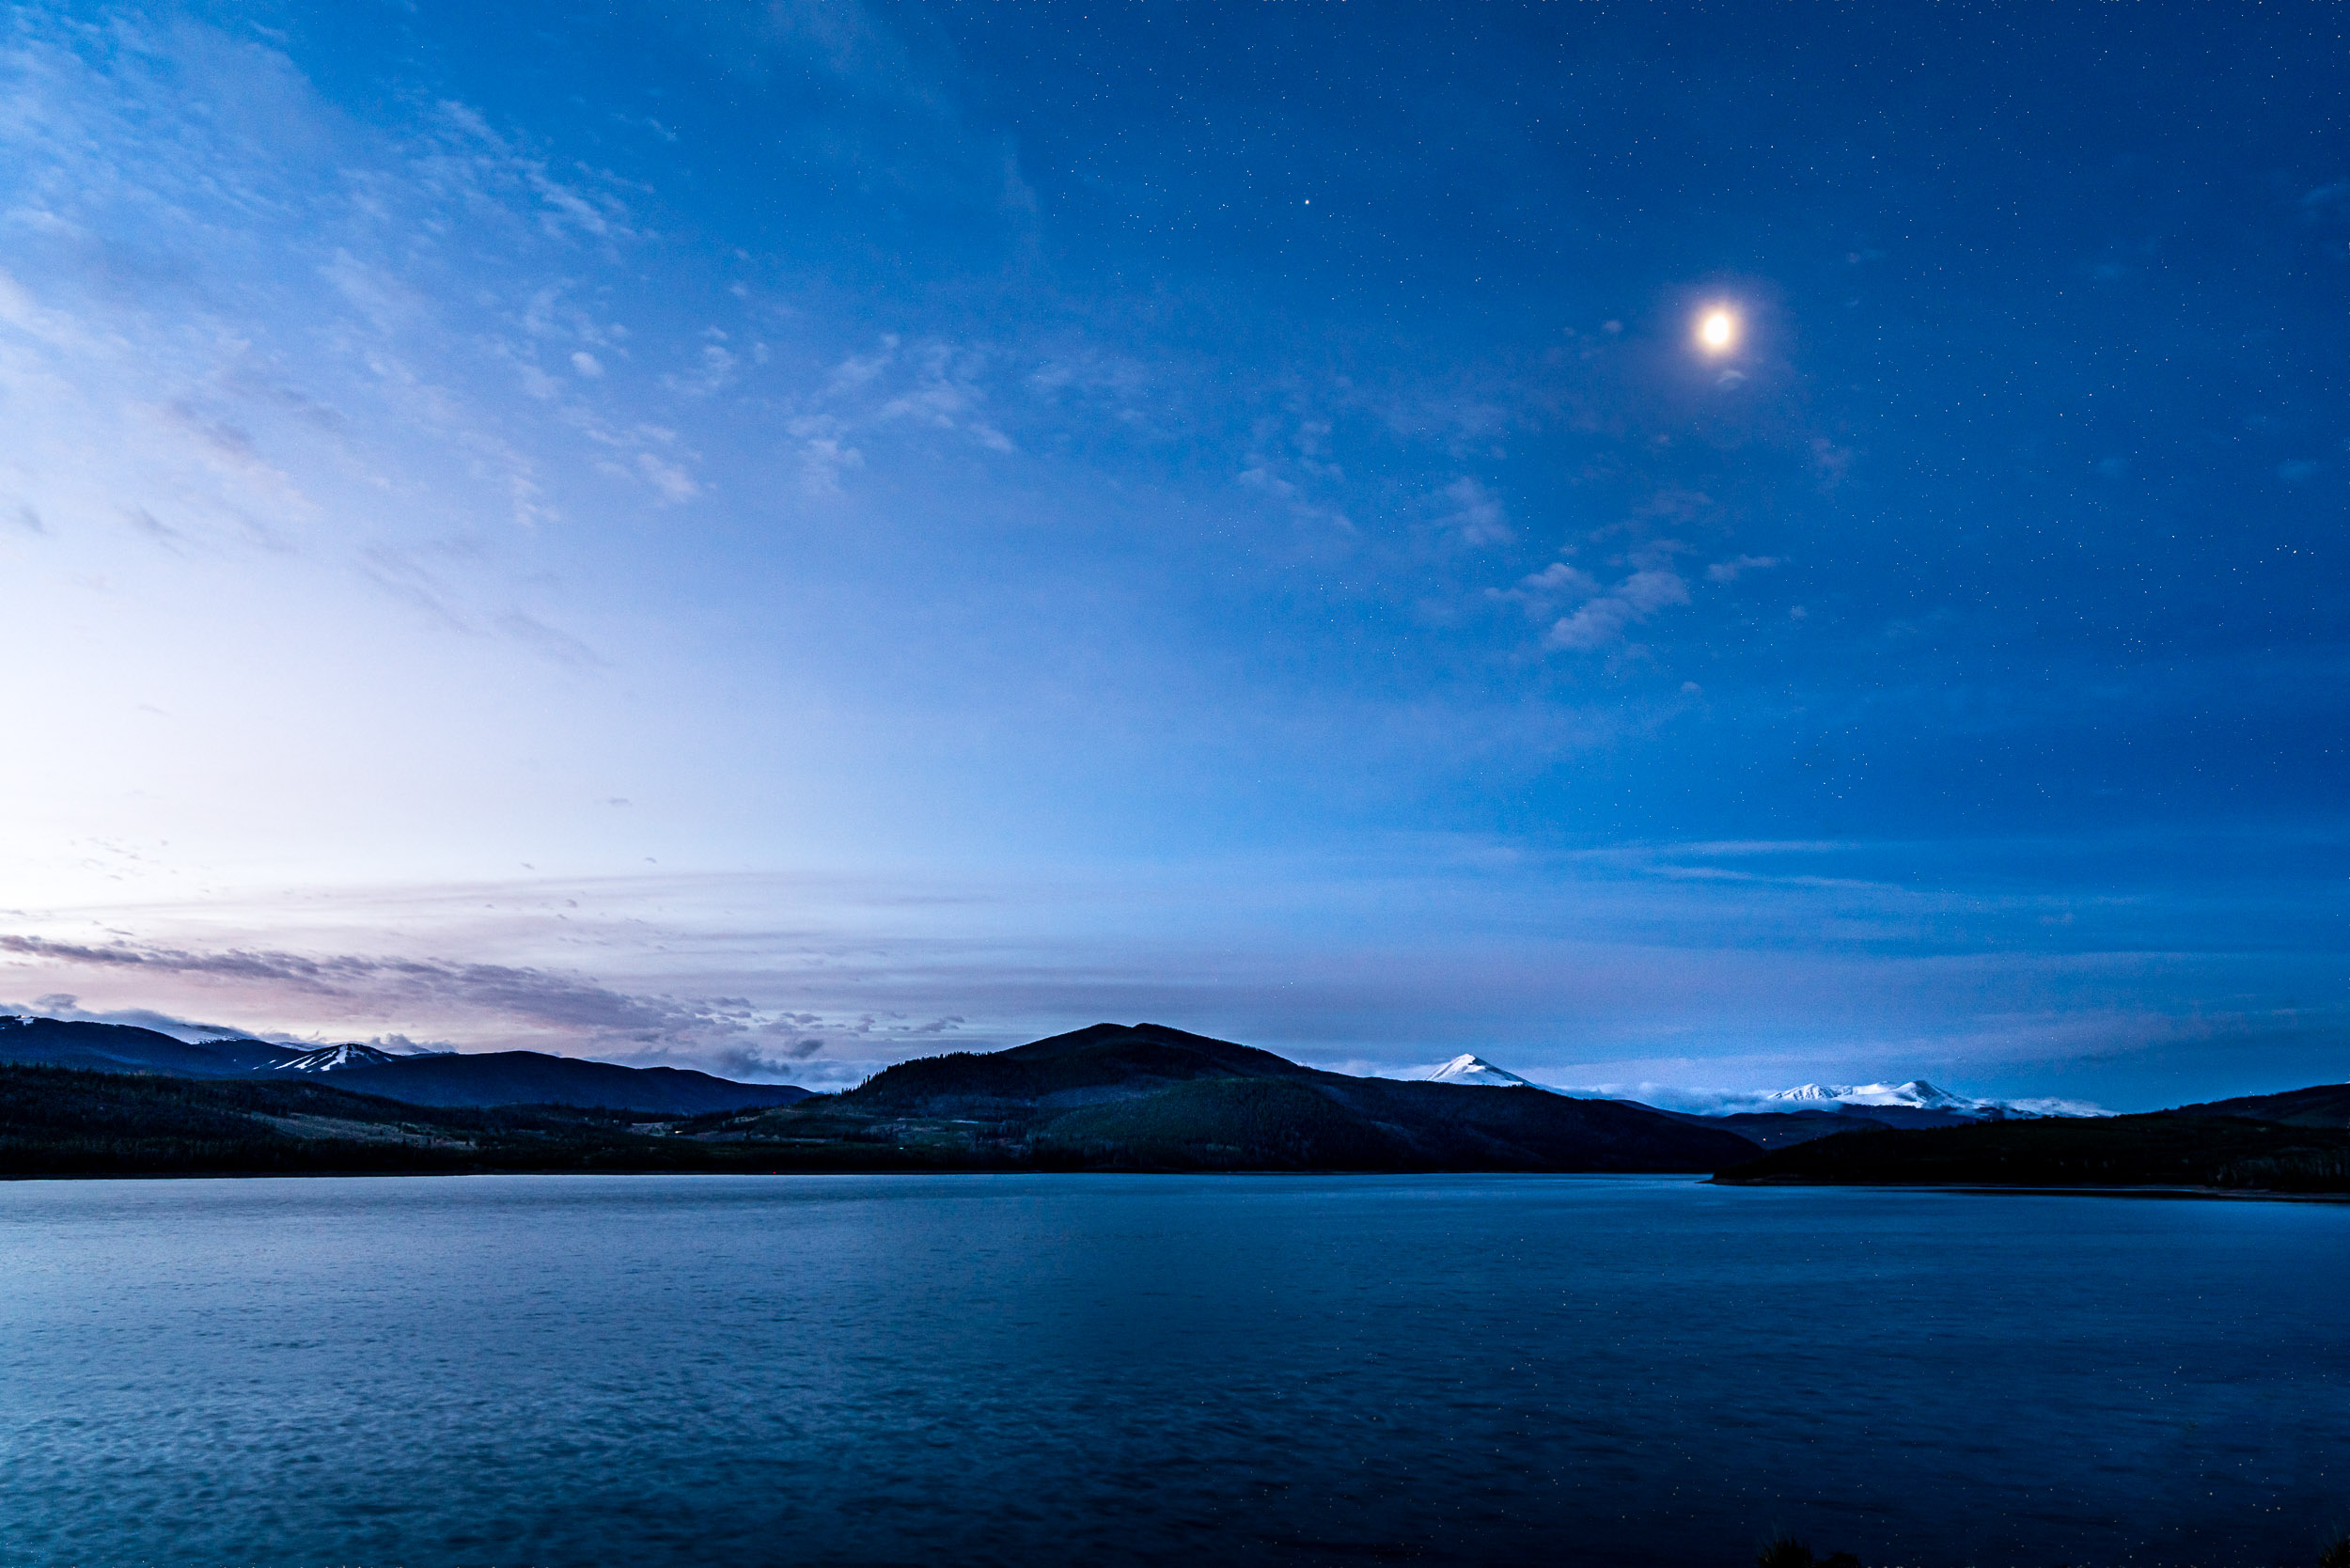
Photo by Jenn Mishra | It isn’t as dark as you think at night. This image was taken at blue hour, before the sun rose, with a full moon. At 2.5 seconds at f/14, ISO800, the moon is already too bright.
Finding the Light: Exposure Triangle Basics
Photography is often described as painting with light. When you are outdoors, a major source of light is the sun. It might be bright and harsh, blocked to create shade, or muted by clouds. But the sun is bright enough to give you well-exposed photographs. This ever-present light source disappears at night. You have to do something different with your photography. Let’s see how the exposure triangle, shutter speed, aperture, and ISO, help you find the light at night.
Lengthen Shutter Speed
The term “long-exposure” has to do with shutter speed. When you press the shutter button, the shutter inside of your camera opens and closes. When the sun is bright, we have to limit the amount of light coming into our cameras by opening and closing the shutter quickly. At night the light is limited. But even on a dark night, there is some light. Leaving the shutter open longer lets your sensor collect all available light. How long you leave your shutter open depends on how much light is in the scene. You may have to leave your shutter open a long time to collect enough light to see in the dark.
Most digital cameras let you choose shutter speeds up to 30 seconds. Using a remote shutter, you can leave your shutter open longer. Minutes at a time – even hours! But long exposures only work if your camera doesn’t move. For long-exposure photography, you need a tripod. Even the slightest movement in the camera will show as a blur in your image.
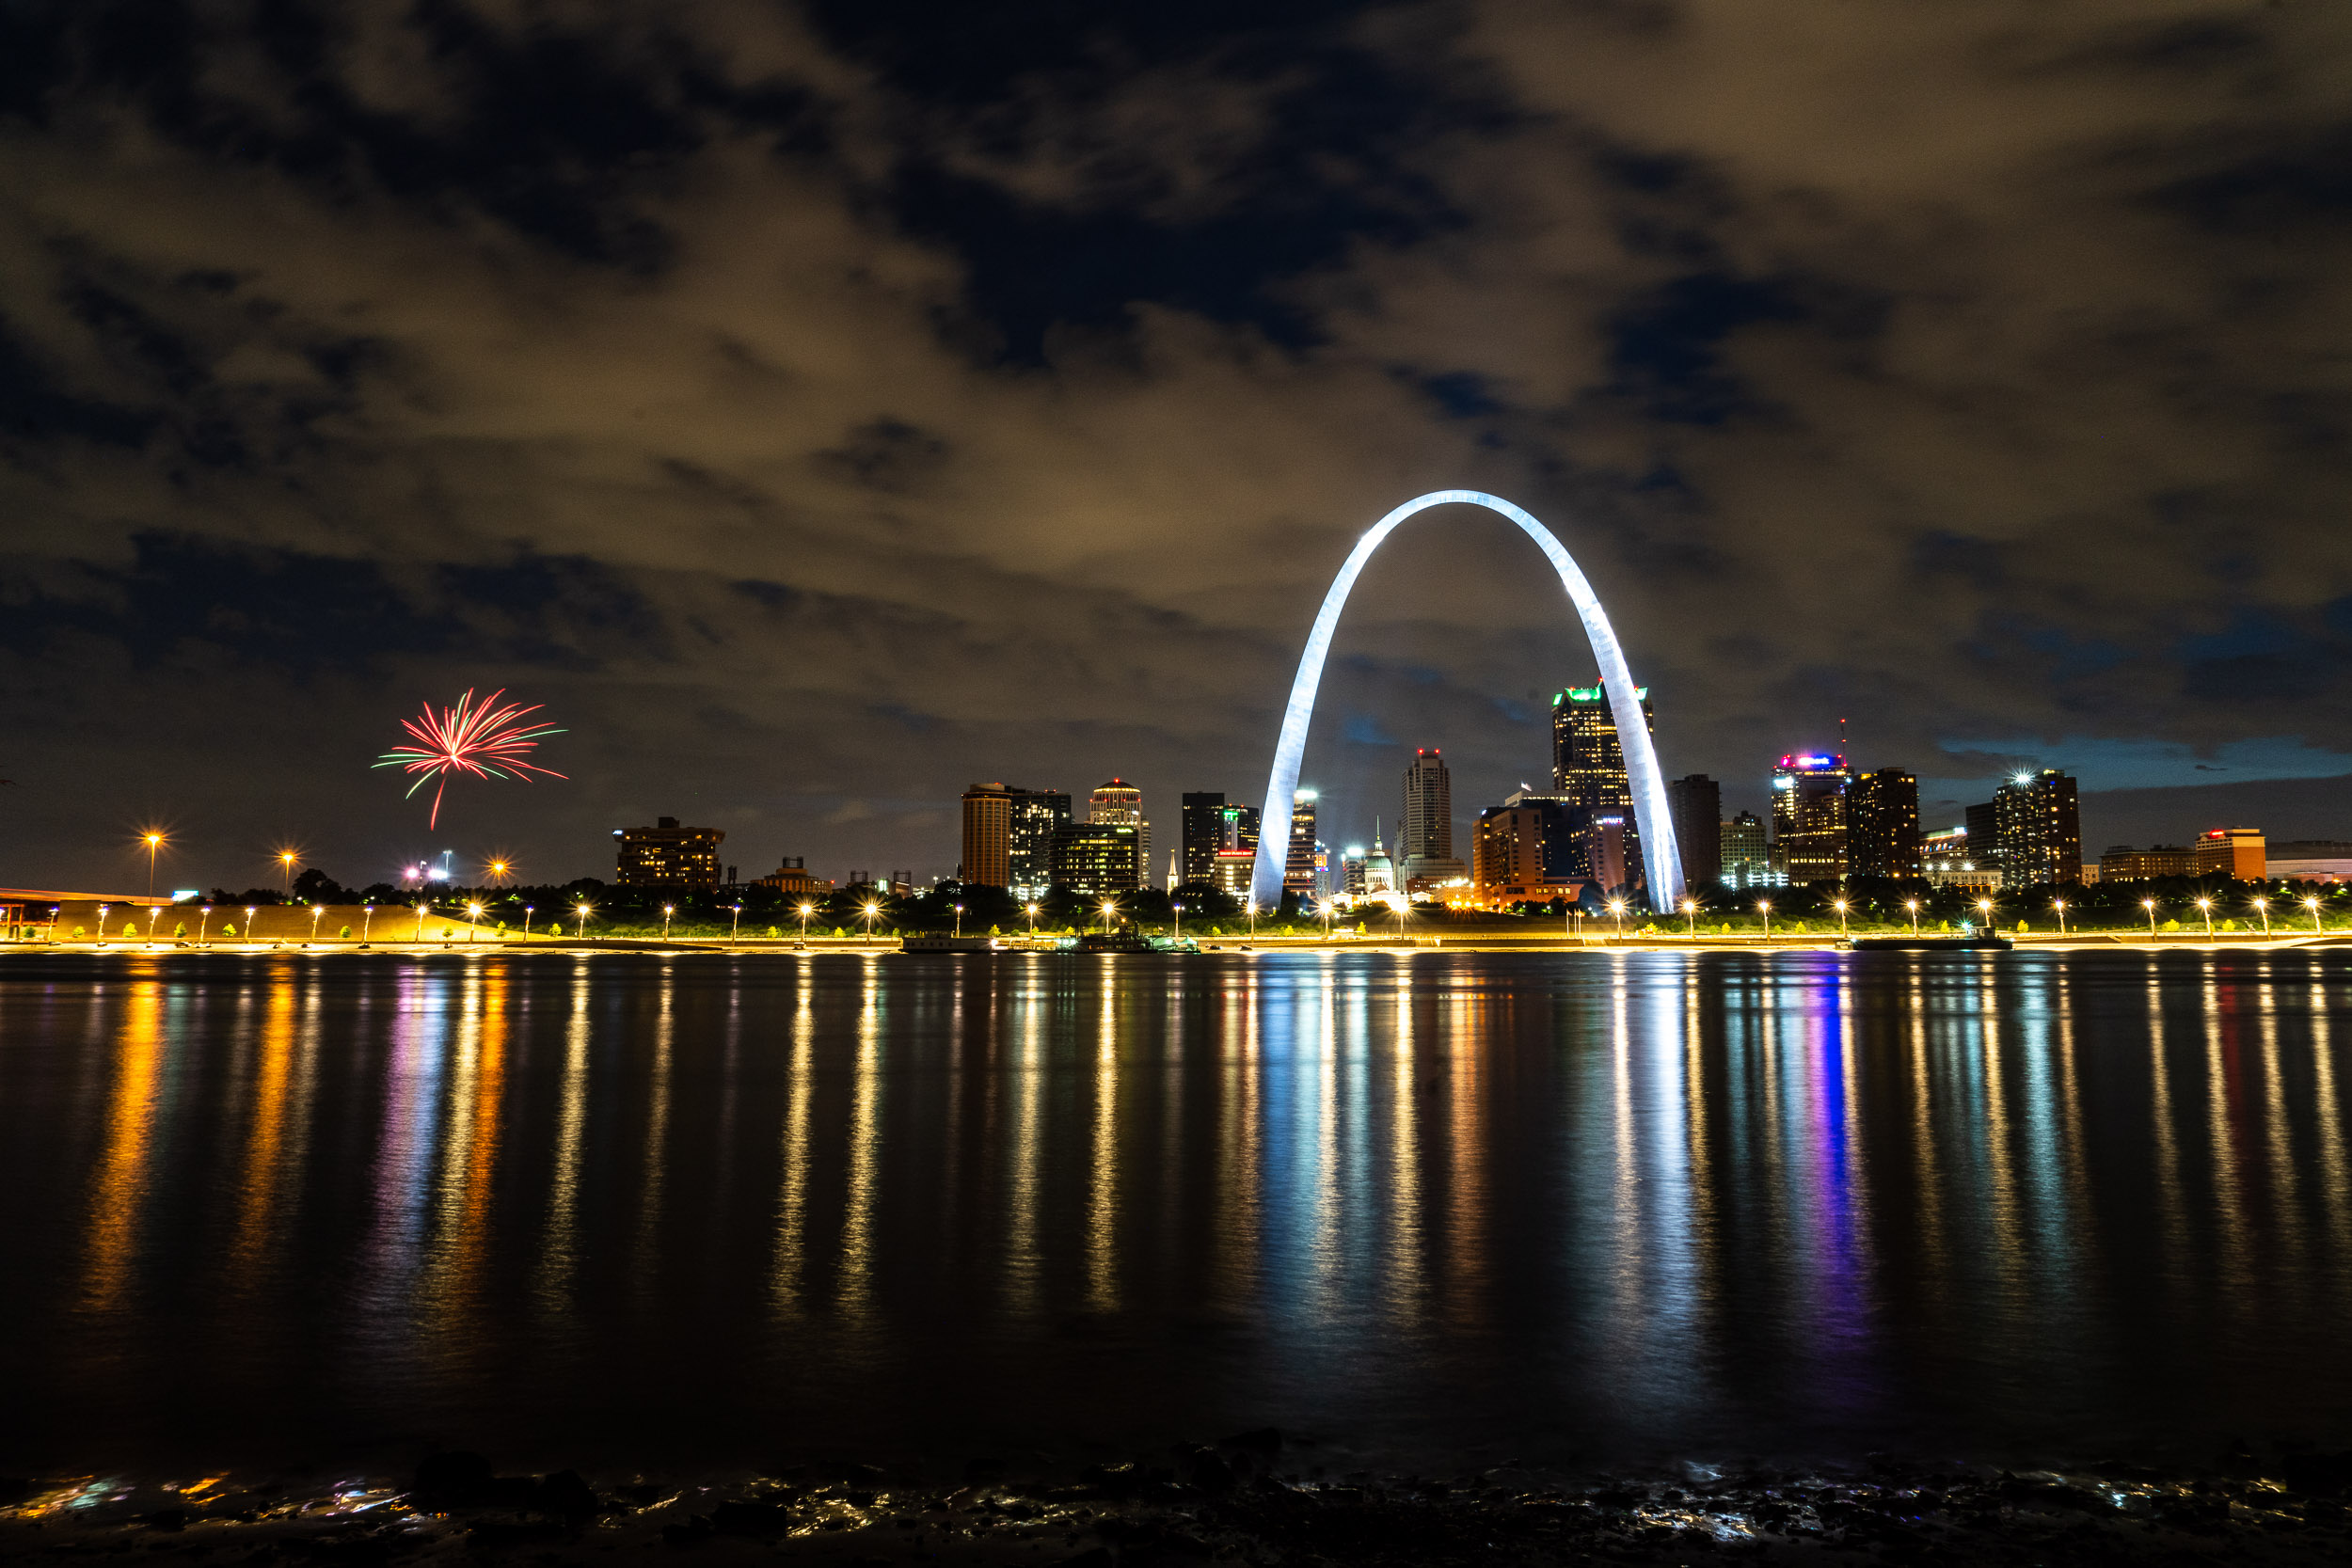
Photo by Jenn Mishra | A longer shutter speed blurred the water in the river making it look like glass. It also captured light trails in the single firework. Settings were 10 seconds at f/16, ISO800.
Use Wide Aperture
Another way to collect more light at night is to open your aperture wider. When you take a photo, a hole opens to let in light. You can make the opening larger or smaller depending on which f-stop you select. The f-stops with lower numbers, like f/2.8 and f/5.6, are larger or wider than apertures with higher f-stop numbers, like f/16.
At night you want to let in as much light as possible by opening the aperture as wide as possible. How wide you can open the aperture depends on your lens. Some lenses let you use f/2.8. Others open even wider to f/1.4.
Wide apertures give you a shallow depth of field. Usually, this means that only a small part of your frame is in focus. But in this article, we are talking about photographing the night sky. The moon and the stars are far away. Really far away! If you focus your camera to infinity, the depth of field doesn’t matter. The entire night sky will be in focus.
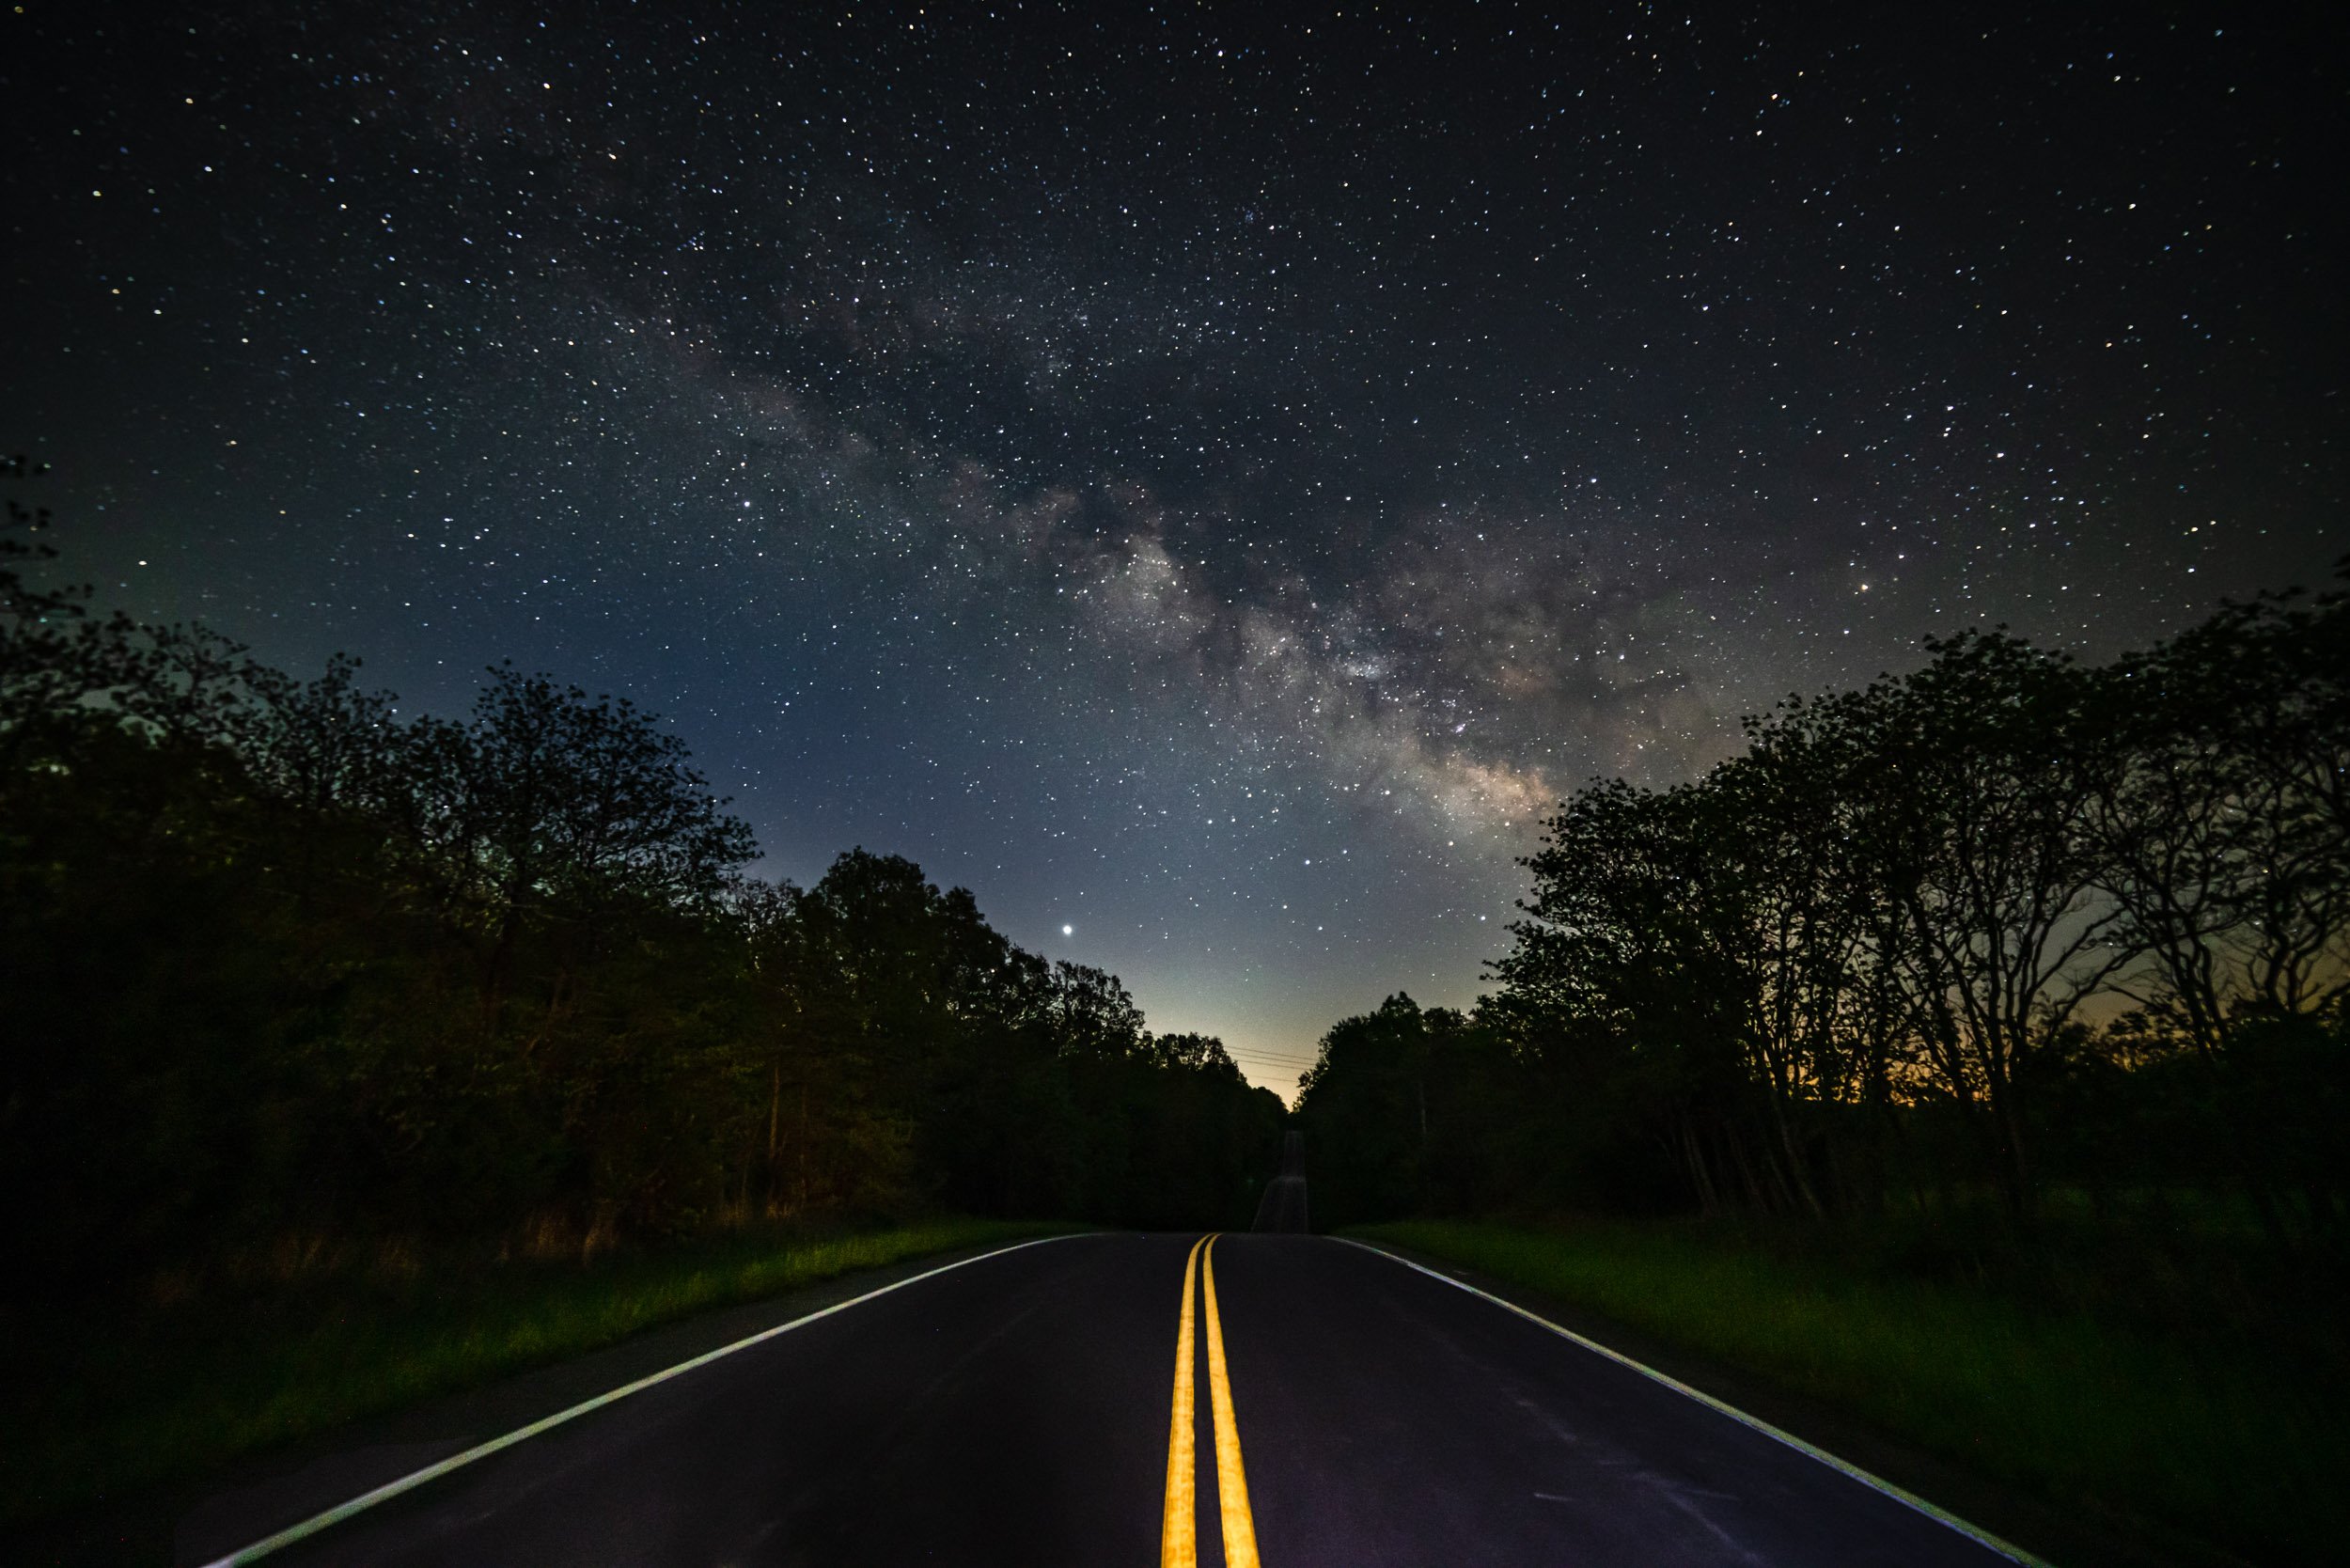
Photo by Jenn Mishra | Milky Way at the end of the road. Settings were 20 seconds @ f/2.8, ISO 3200.
Use High ISO
ISO makes your sensor more or less sensitive to light. When you are photographing at night, you want your sensor to be extra sensitive to any light in the scene. To do this, raise your ISO. But there is a trade-off. Raising your ISO makes your image brighter, but it also introduces grain or noise into your image. Your photo won’t be as clear at ISO 5000 as it is at ISO 100.
Digital cameras improve ISO performance with every version released. You can feel more confident using higher ISOs with today’s cameras. Also, photo editing software like Topaz DeNoise removes grain from your image. This is especially when shooting street photography at night. Raising your ISO lets you use faster shutter speeds to freeze motion. The maximum ISO setting on your camera will have a lot of grain. But for night photography, a reasonable ISO can be as high as 5,000 or 10,000, on most modern digital cameras.

Photo by Jenn Mishra | For street photography at night, use a higher ISO to keep the shutter speed fast. My settings were 1/125th of a second at f/5.6, ISO 8000.
When photographing in the dark, you can lengthen your shutter speed, use a wide aperture, and raise your ISO. But you won’t need to go to extremes to take well-exposed photos at night.
Camera Settings for Night Photography
When photographing at night, you will need camera settings that let in more light than during the day. But it is not as simple as dialing-in one setting for the night sky and leaving it. There are many different types of night sky. Each uses a unique combination of camera settings. Let’s start with the darkest night sky you’ll likely photograph.
Milky Way and Star Photography
You’ll need dark skies to photograph the Milky Way. This means photographing during the darkest part of the night, and away from city lights. If you live close to a city, the sky may not be dark enough to see the Milky Way. It is there, you just can’t see it. Use a light pollution map to find dark skies. https://darksitefinder.com/map
You might think that you need to let in as much light as possible to photograph the Milky Way. You would be partially right. Astro-photographers use fast lenses that have an f/2.8 or even an f/1.4 aperture. They also use high ISOs like 3200 or 5000 depending on how well their cameras handle the noise. They also take a long exposure. Just not as long as you might think.
The 500-Rule tells you how long you can leave your shutter open when photographing stars. Divide 500 by the focal length of your lens. This is your maximum shutter speed. I use a Rokinon 14mm lens for photographing the Milky Way. Divide 500 by 14. The maximum shutter speed for a 14mm lens is 35 seconds
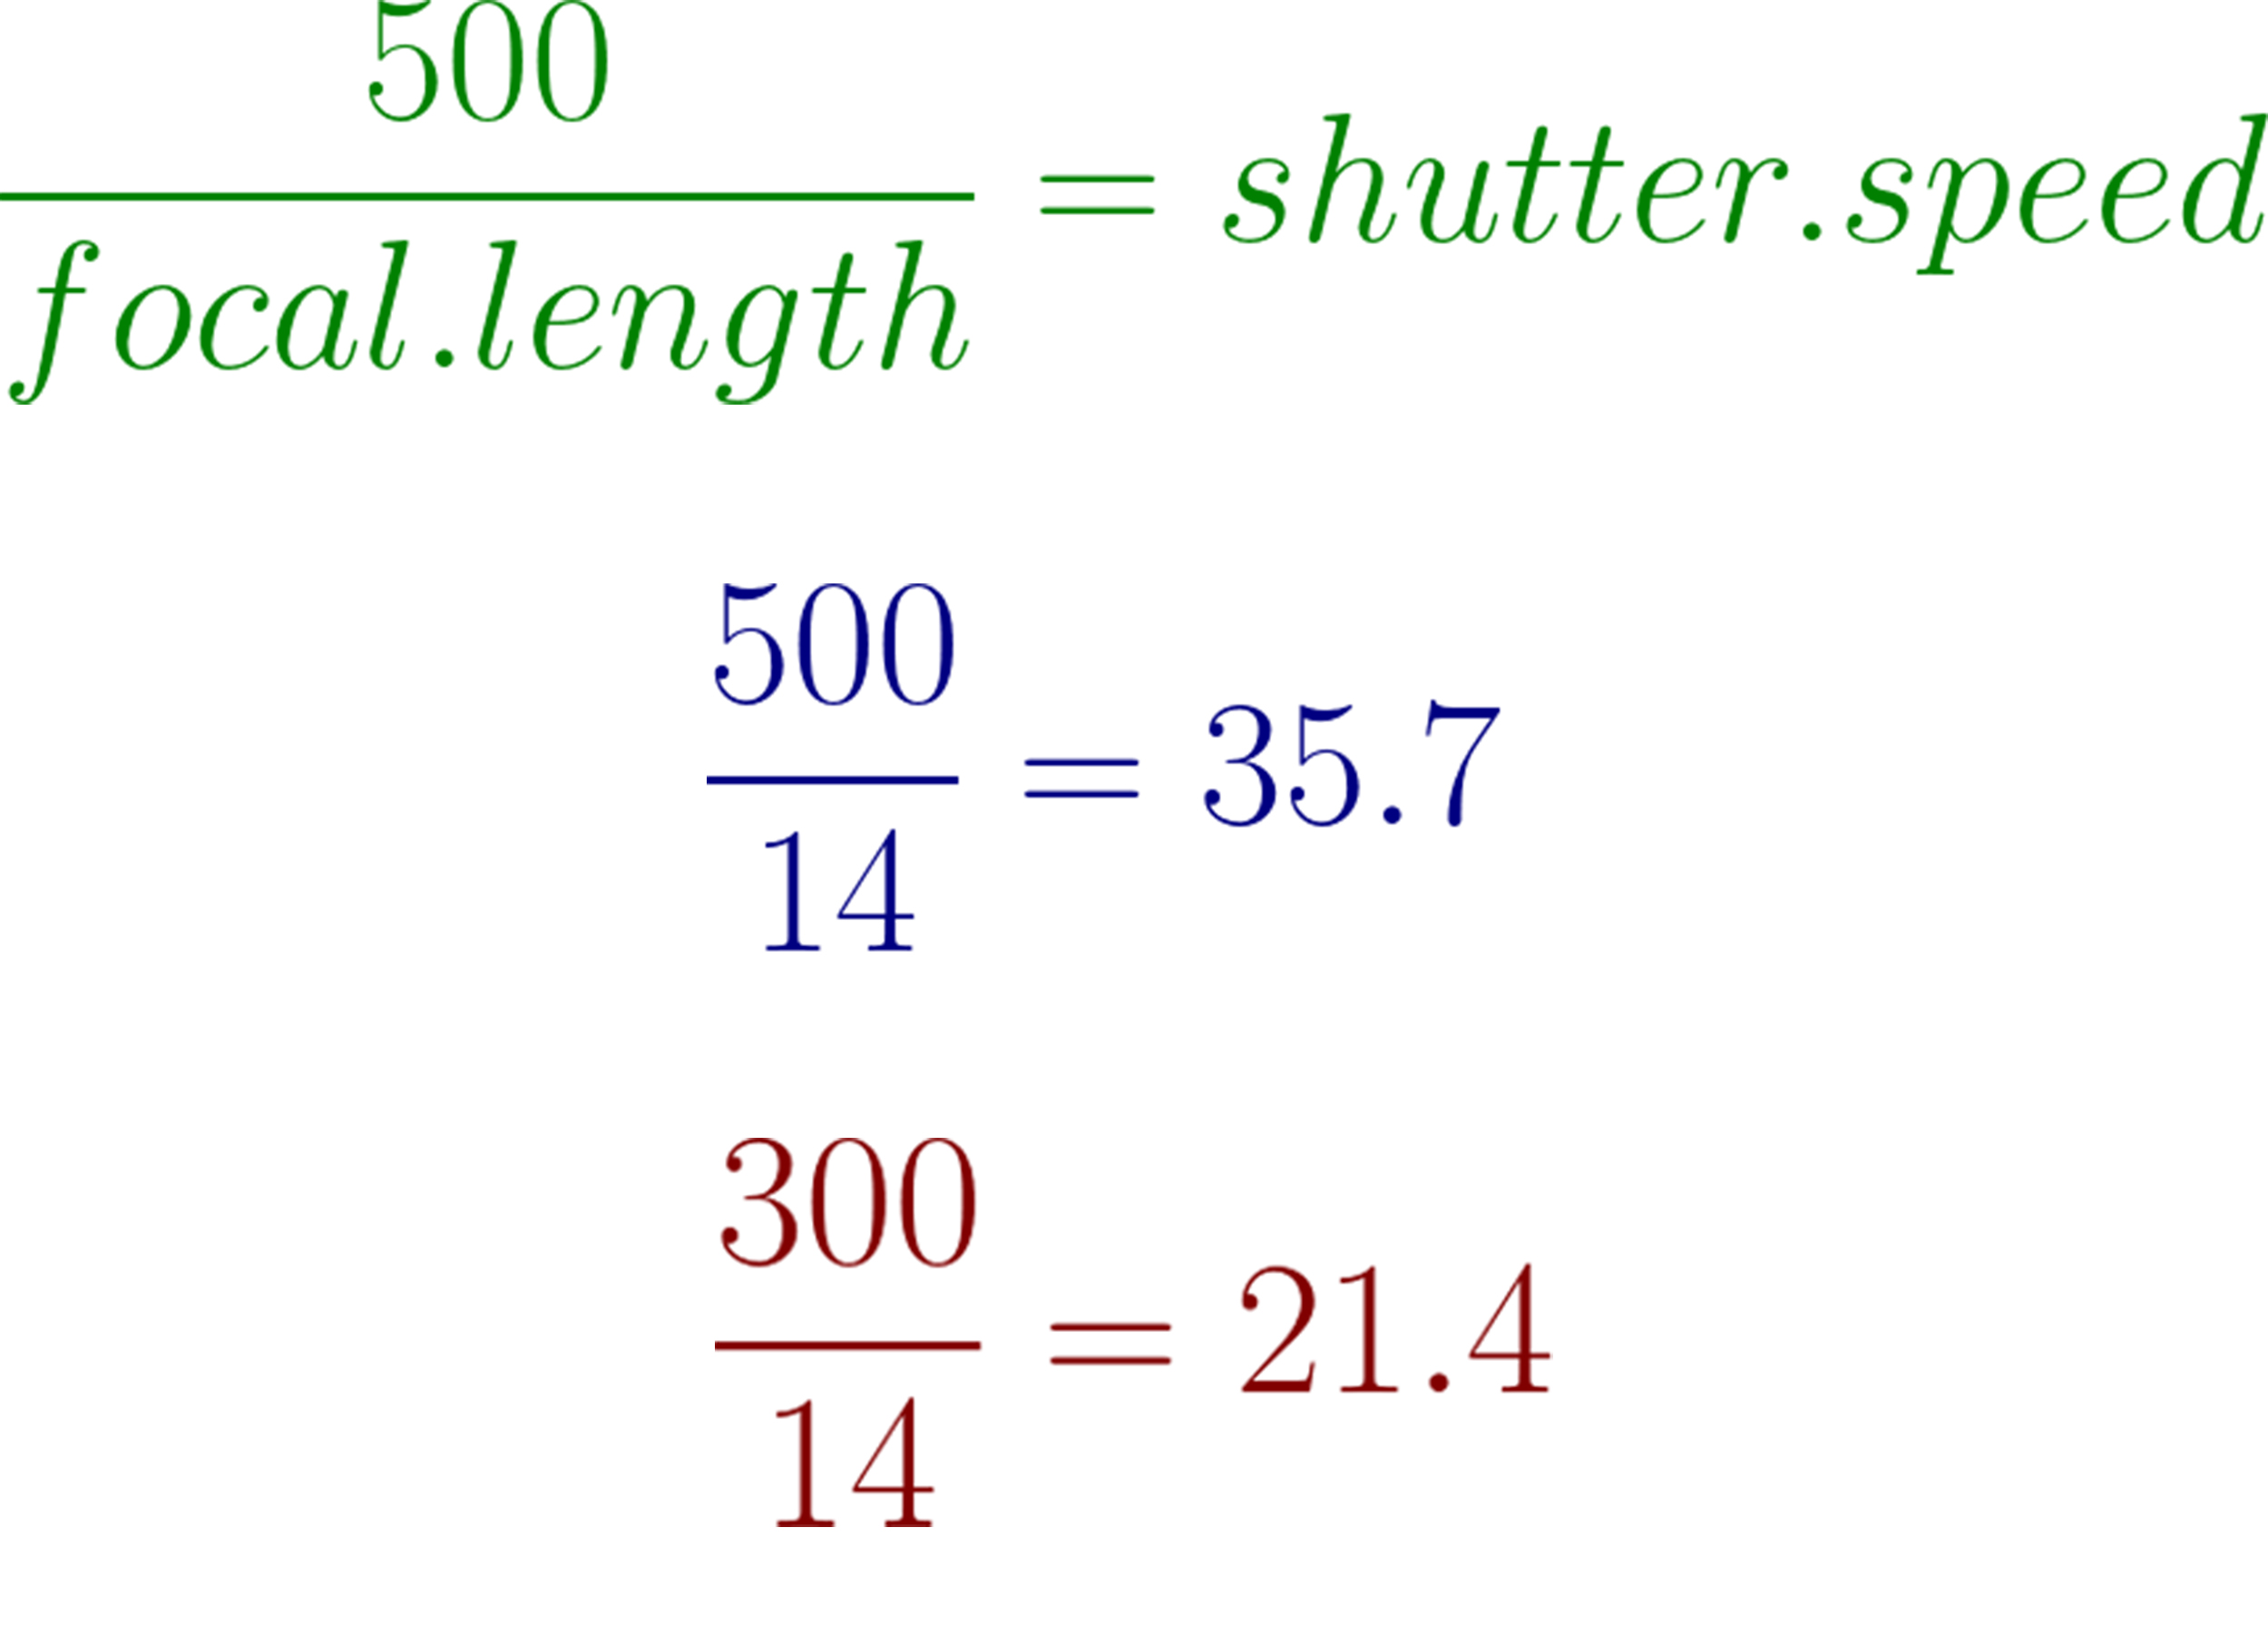
Photo by Jenn Mishra | Formula for computing shutter speed using the 500-Rule (top), results of shutter speed using a 14mm lens (middle), and computing shutter speed using a 300-Rule (bottom).
If you leave your shutter open too long, you will see light trails. The stars start to elongate. It looks as if they are moving. But the motion you see is the rotation of the earth.
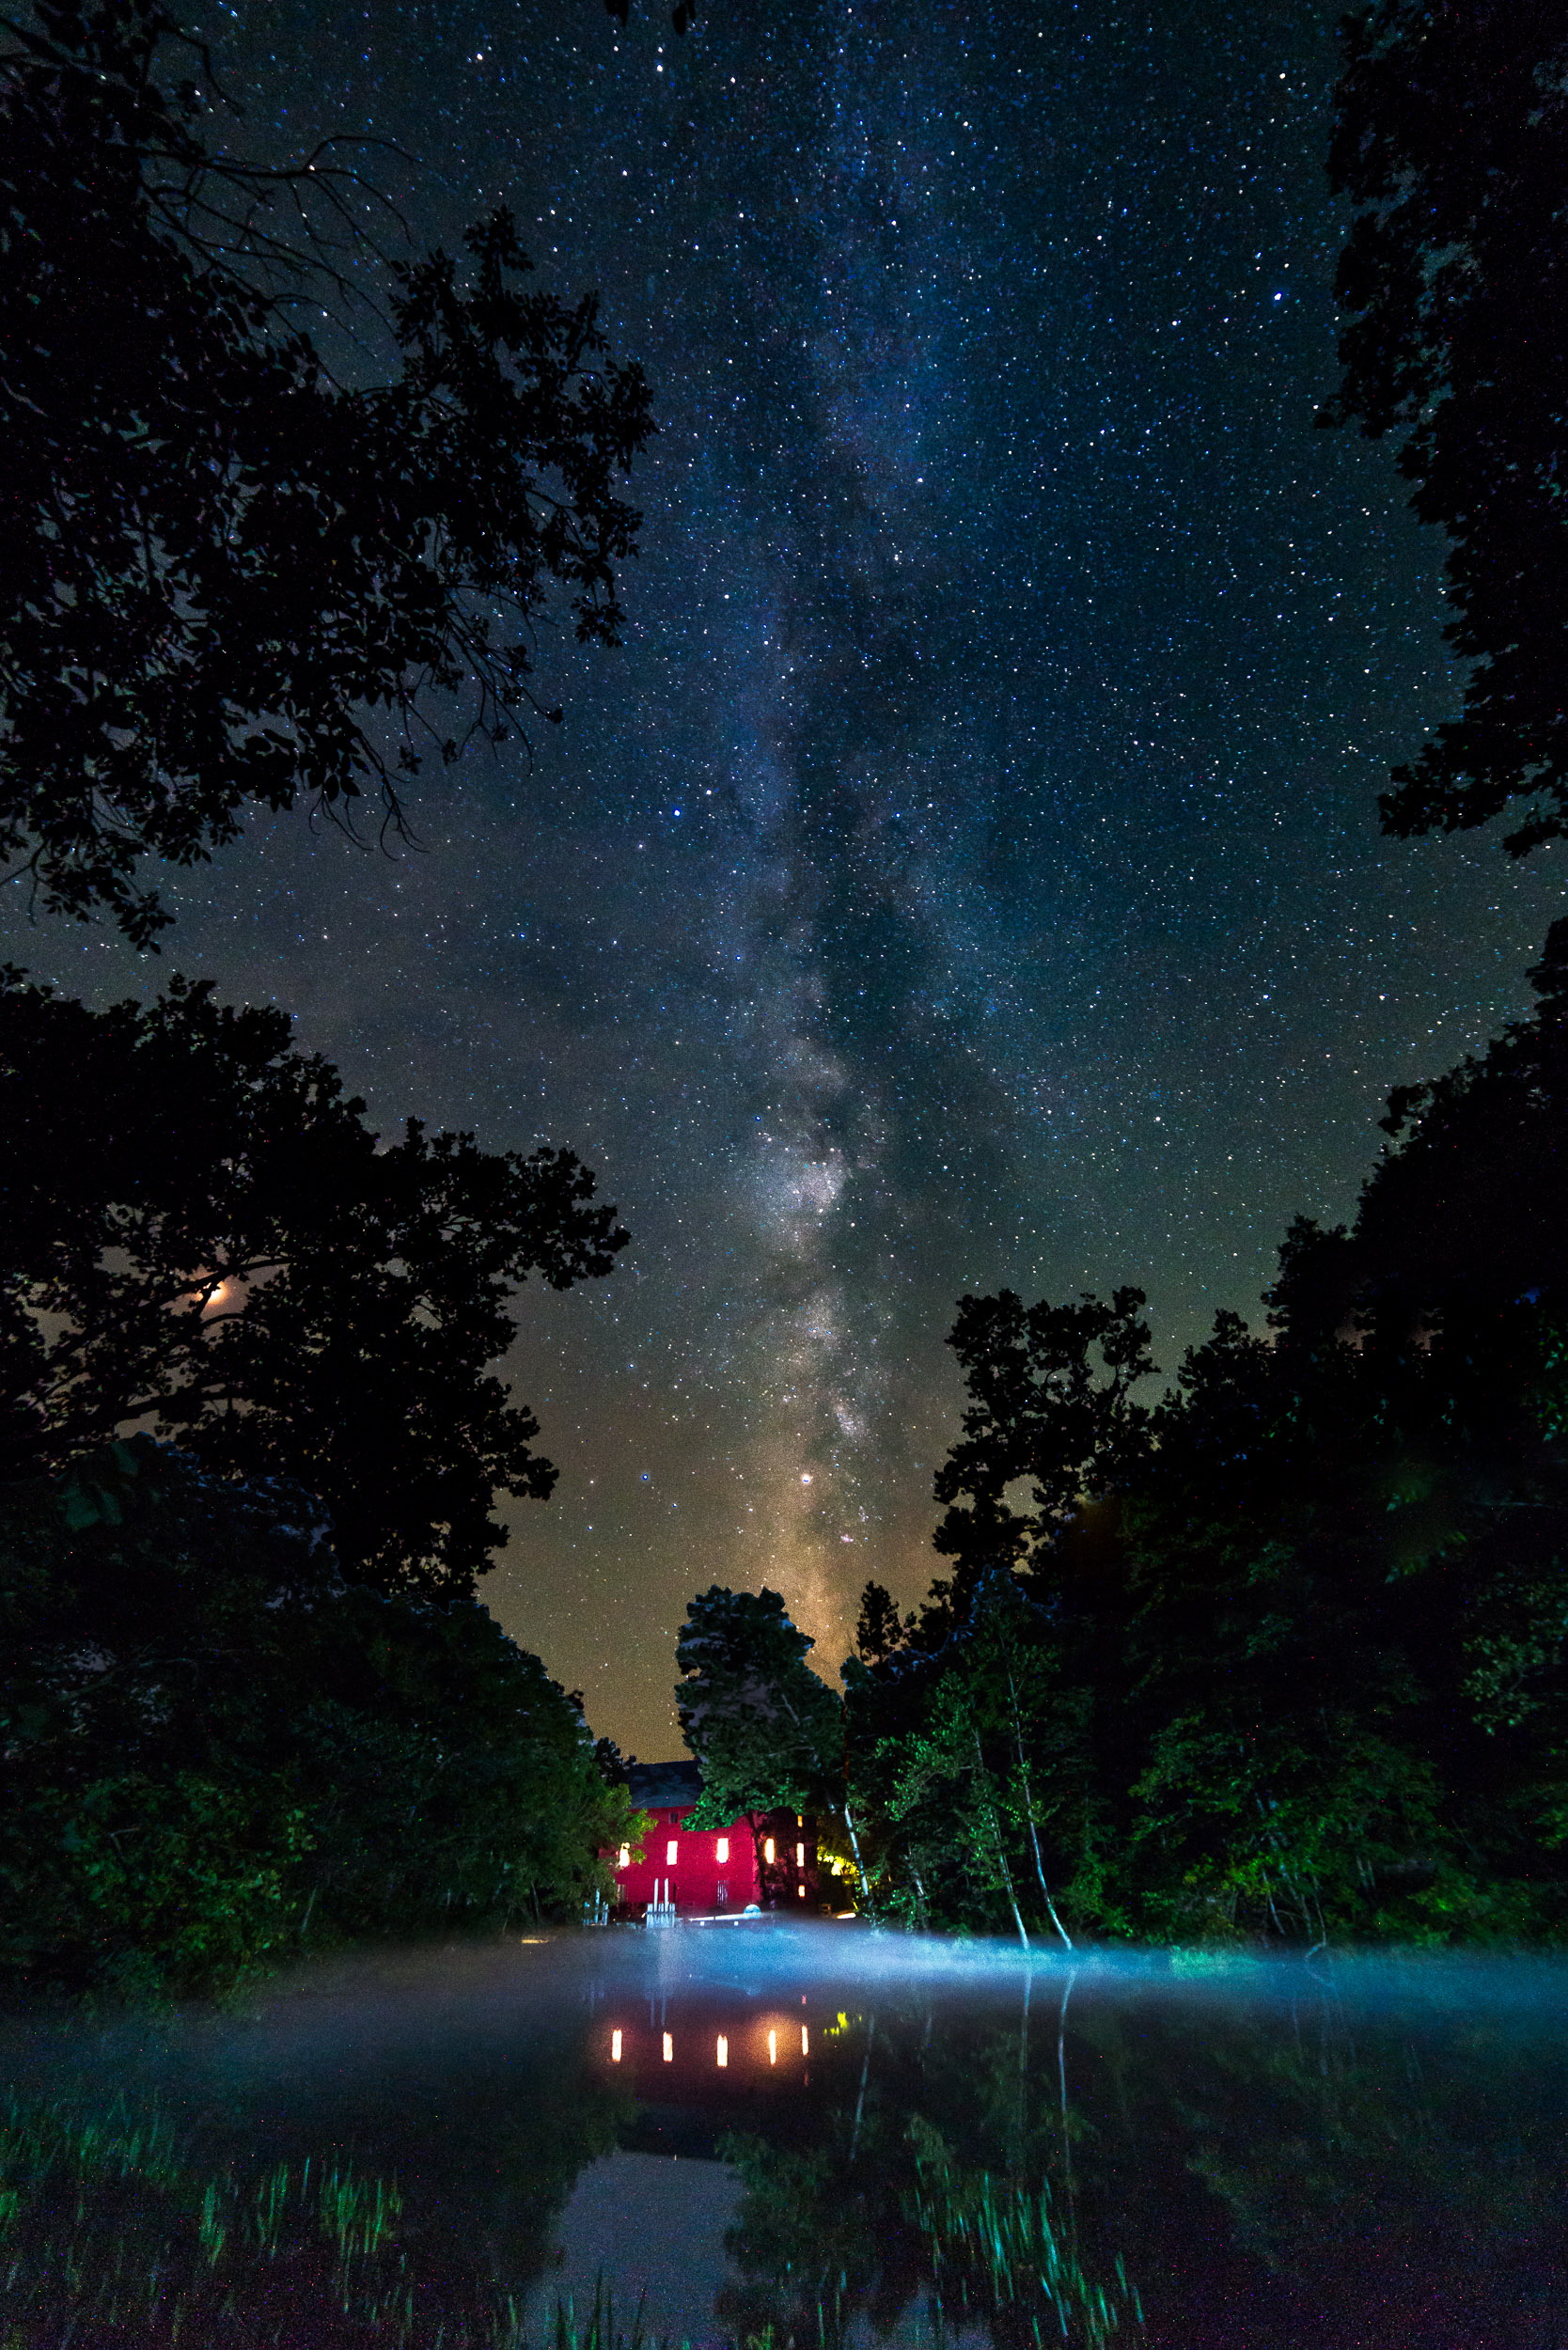
Photo by Jenn Mishra | Milky Way over Alley Springs Mill in southern Missouri. My settings were 20 seconds at f/2.8, ISO3200.
Today’s digital photographers adjust their shutter speed a little slower than what is recommended by the 500-Rule. I use something closer to a 300-Rule to figure my shutter speed.
Your image will be dark, but you can brighten it up with a photo editing program.
Milky Way Camera Settings:
- 20-30 seconds depending on the focal length of your lens
- f/2.8 or faster
- ISO 3200 to 5000
Full Moon
If you have ever tried to take a photo of the moon when it is full or near full, you may have gotten a surprise. Your photos show a bright, white circle against a black sky. There are no details on the moon. If you look at the moon, there are ridges and shadows. But your camera didn’t capture the details. The moon is blown out.
When photographing a full moon, your camera is confused. It sees dark sky and meters to make it brighter. When it does this, the moon becomes too bright. You have to take control of your camera’s settings. They will look more like the settings you use during the day.
The moon may not be as bright as the sun, but it is plenty bright as far as your camera is concerned. Your shutter speed doesn’t need to be long at all. You can handhold your camera at speeds between 1/125 and 1/250th of a second. Use the sharpest aperture of your lens. This is often around f/8 or f/11. Lower your ISO to 100 for the clearest image.
If the moon isn’t full, you will need to adjust your settings to let in more light. But you can easily do this by changing one or two settings. Move your ISO to 400 or change your aperture to f/5.6.
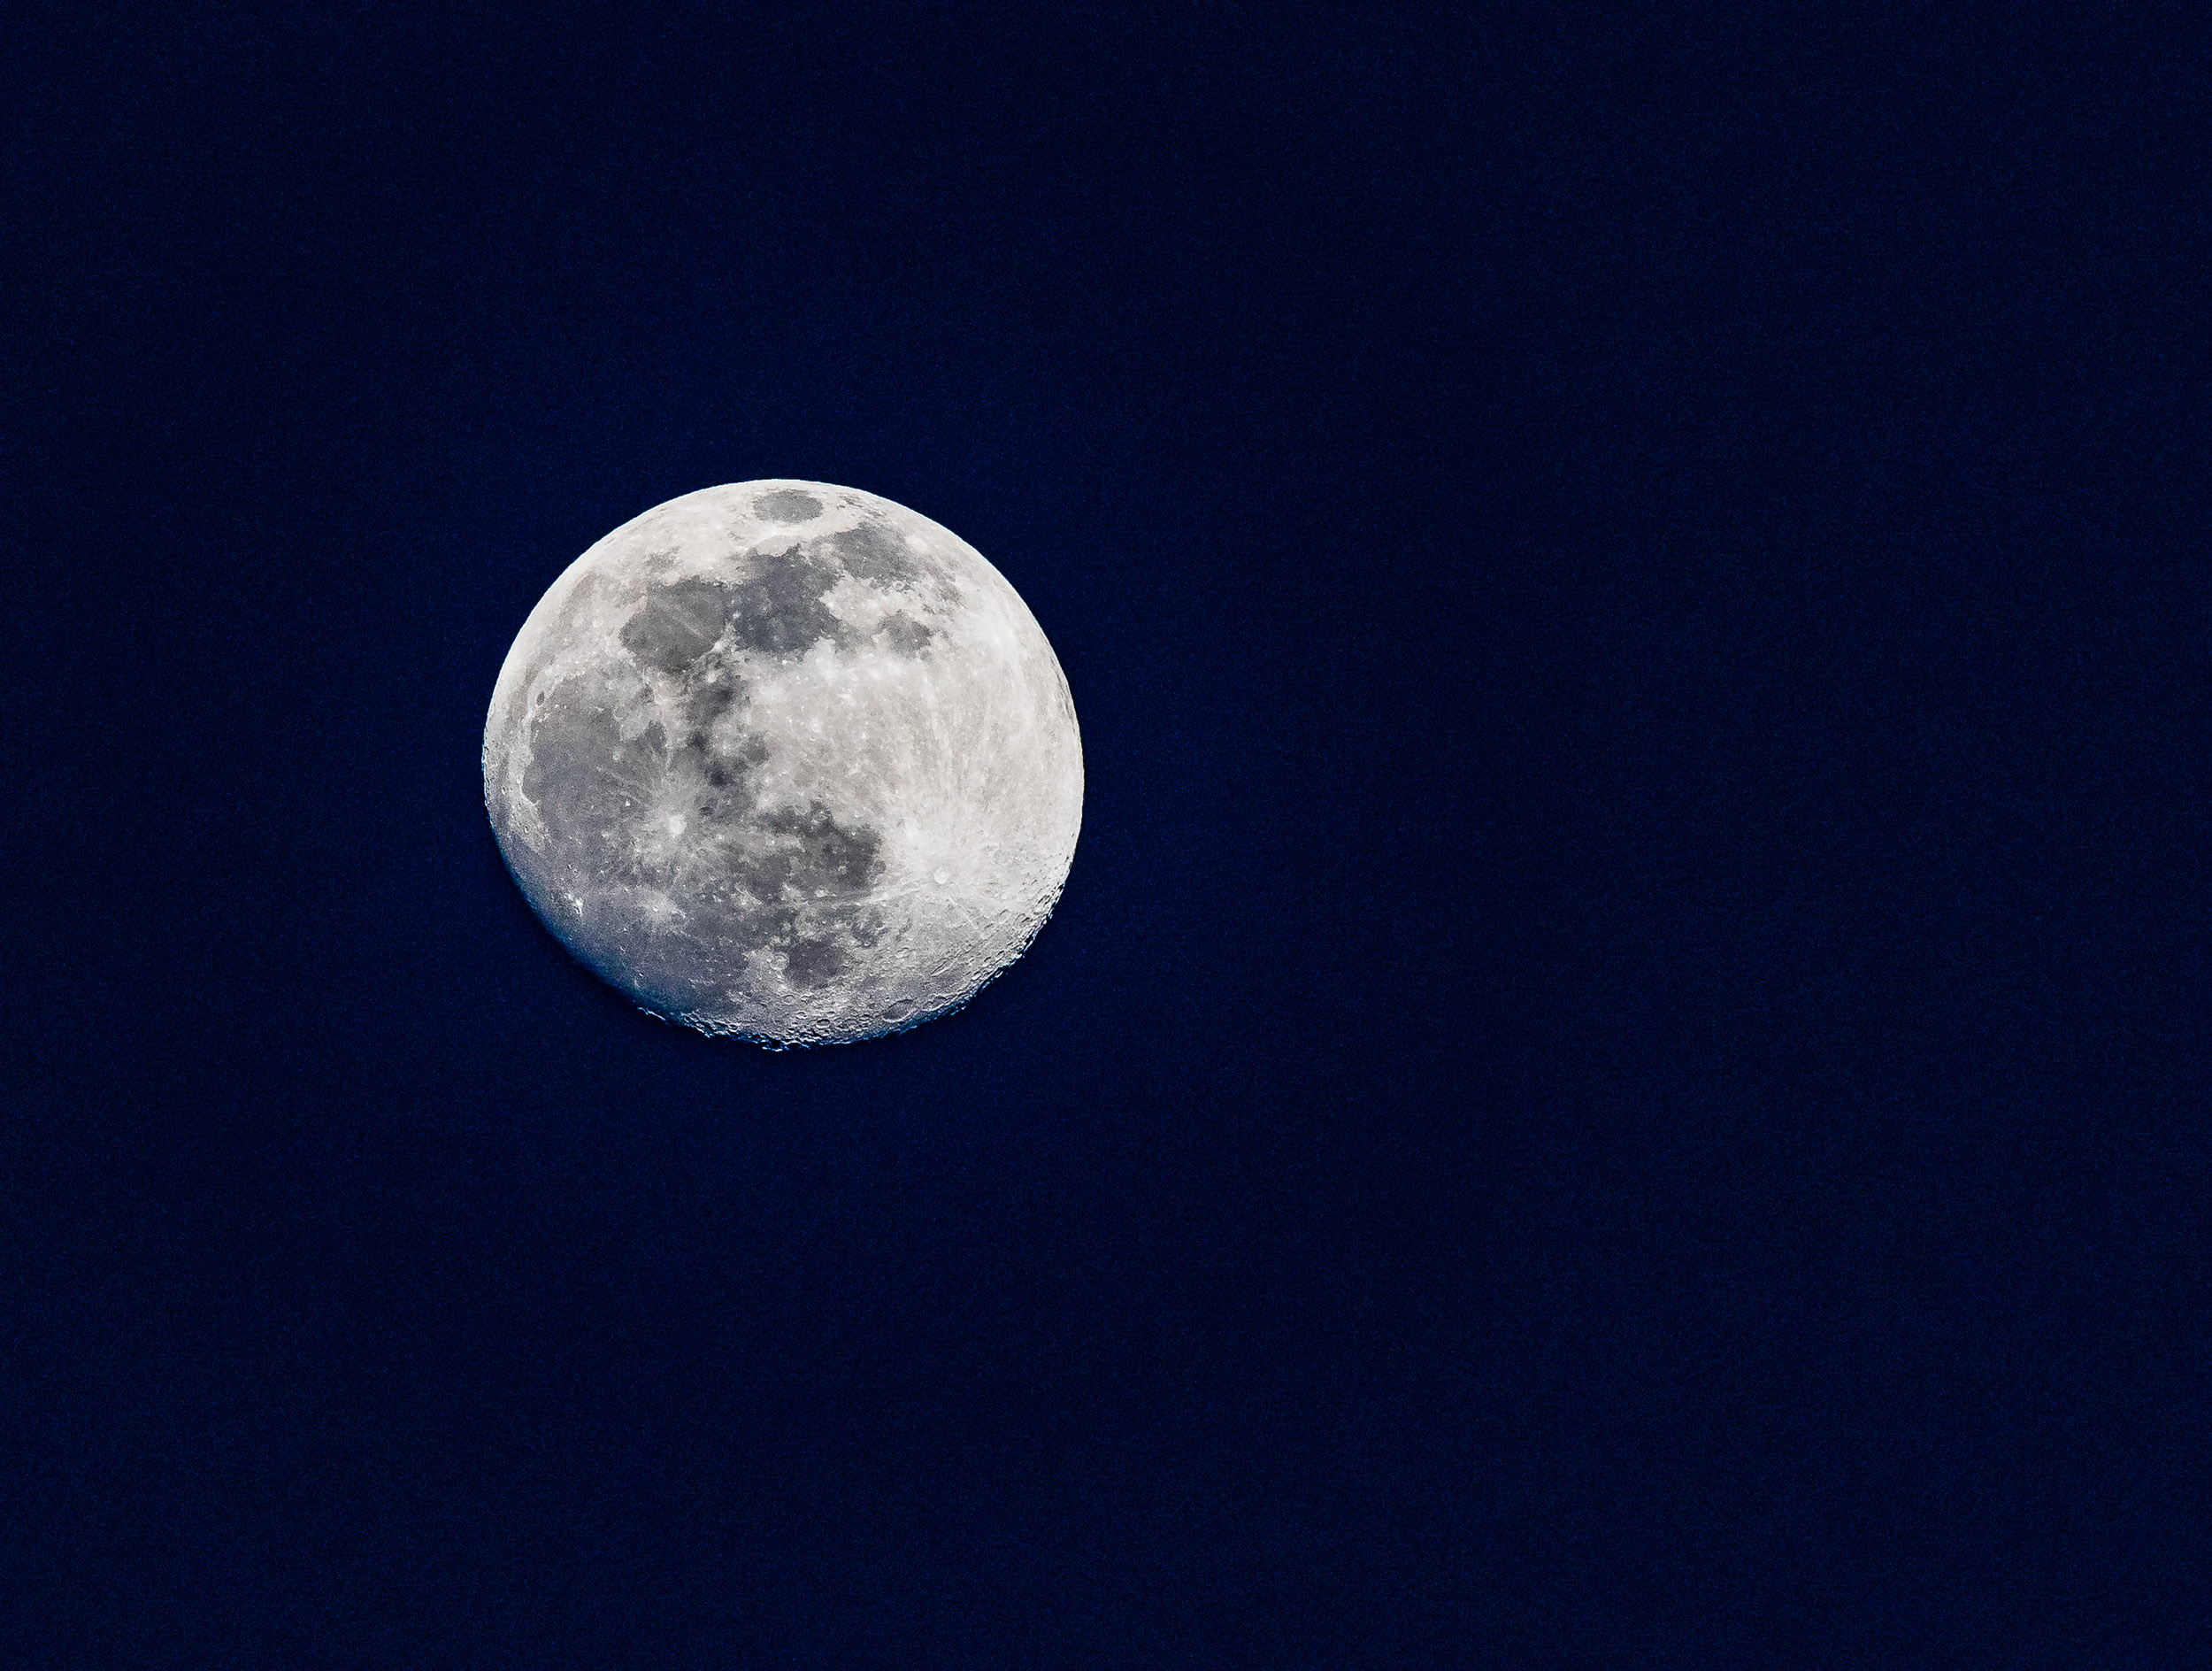
Photo by Jenn Mishra | Full moon captured at 1/500th of a second at f/11, ISO 1250. I could have lowered my ISO and my shutter speed for this pic.
CAPTION: Full moon captured at 1/500th of a second at f/11, ISO 1250. I could have lowered my ISO and my shutter speed for this pic.
Full Moon Camera Settings:
- 1/125th – 1/250th of a second
- f/8-f/11
- ISO 100
Blue Hour
Night comes in stages. After the sun sets and before the sun rises is the blue hour. There is some light from the sun below the horizon. There is a warm glow in the sky when the sun is just below the horizon, and some of the best sunrise and sunset colors come during the blue hour.
We use the terms “blue hour”, but how long the time lasts depends on where you are in the world and the time of the year. An app like PhotoPils tells you exactly when blue hour starts and ends.
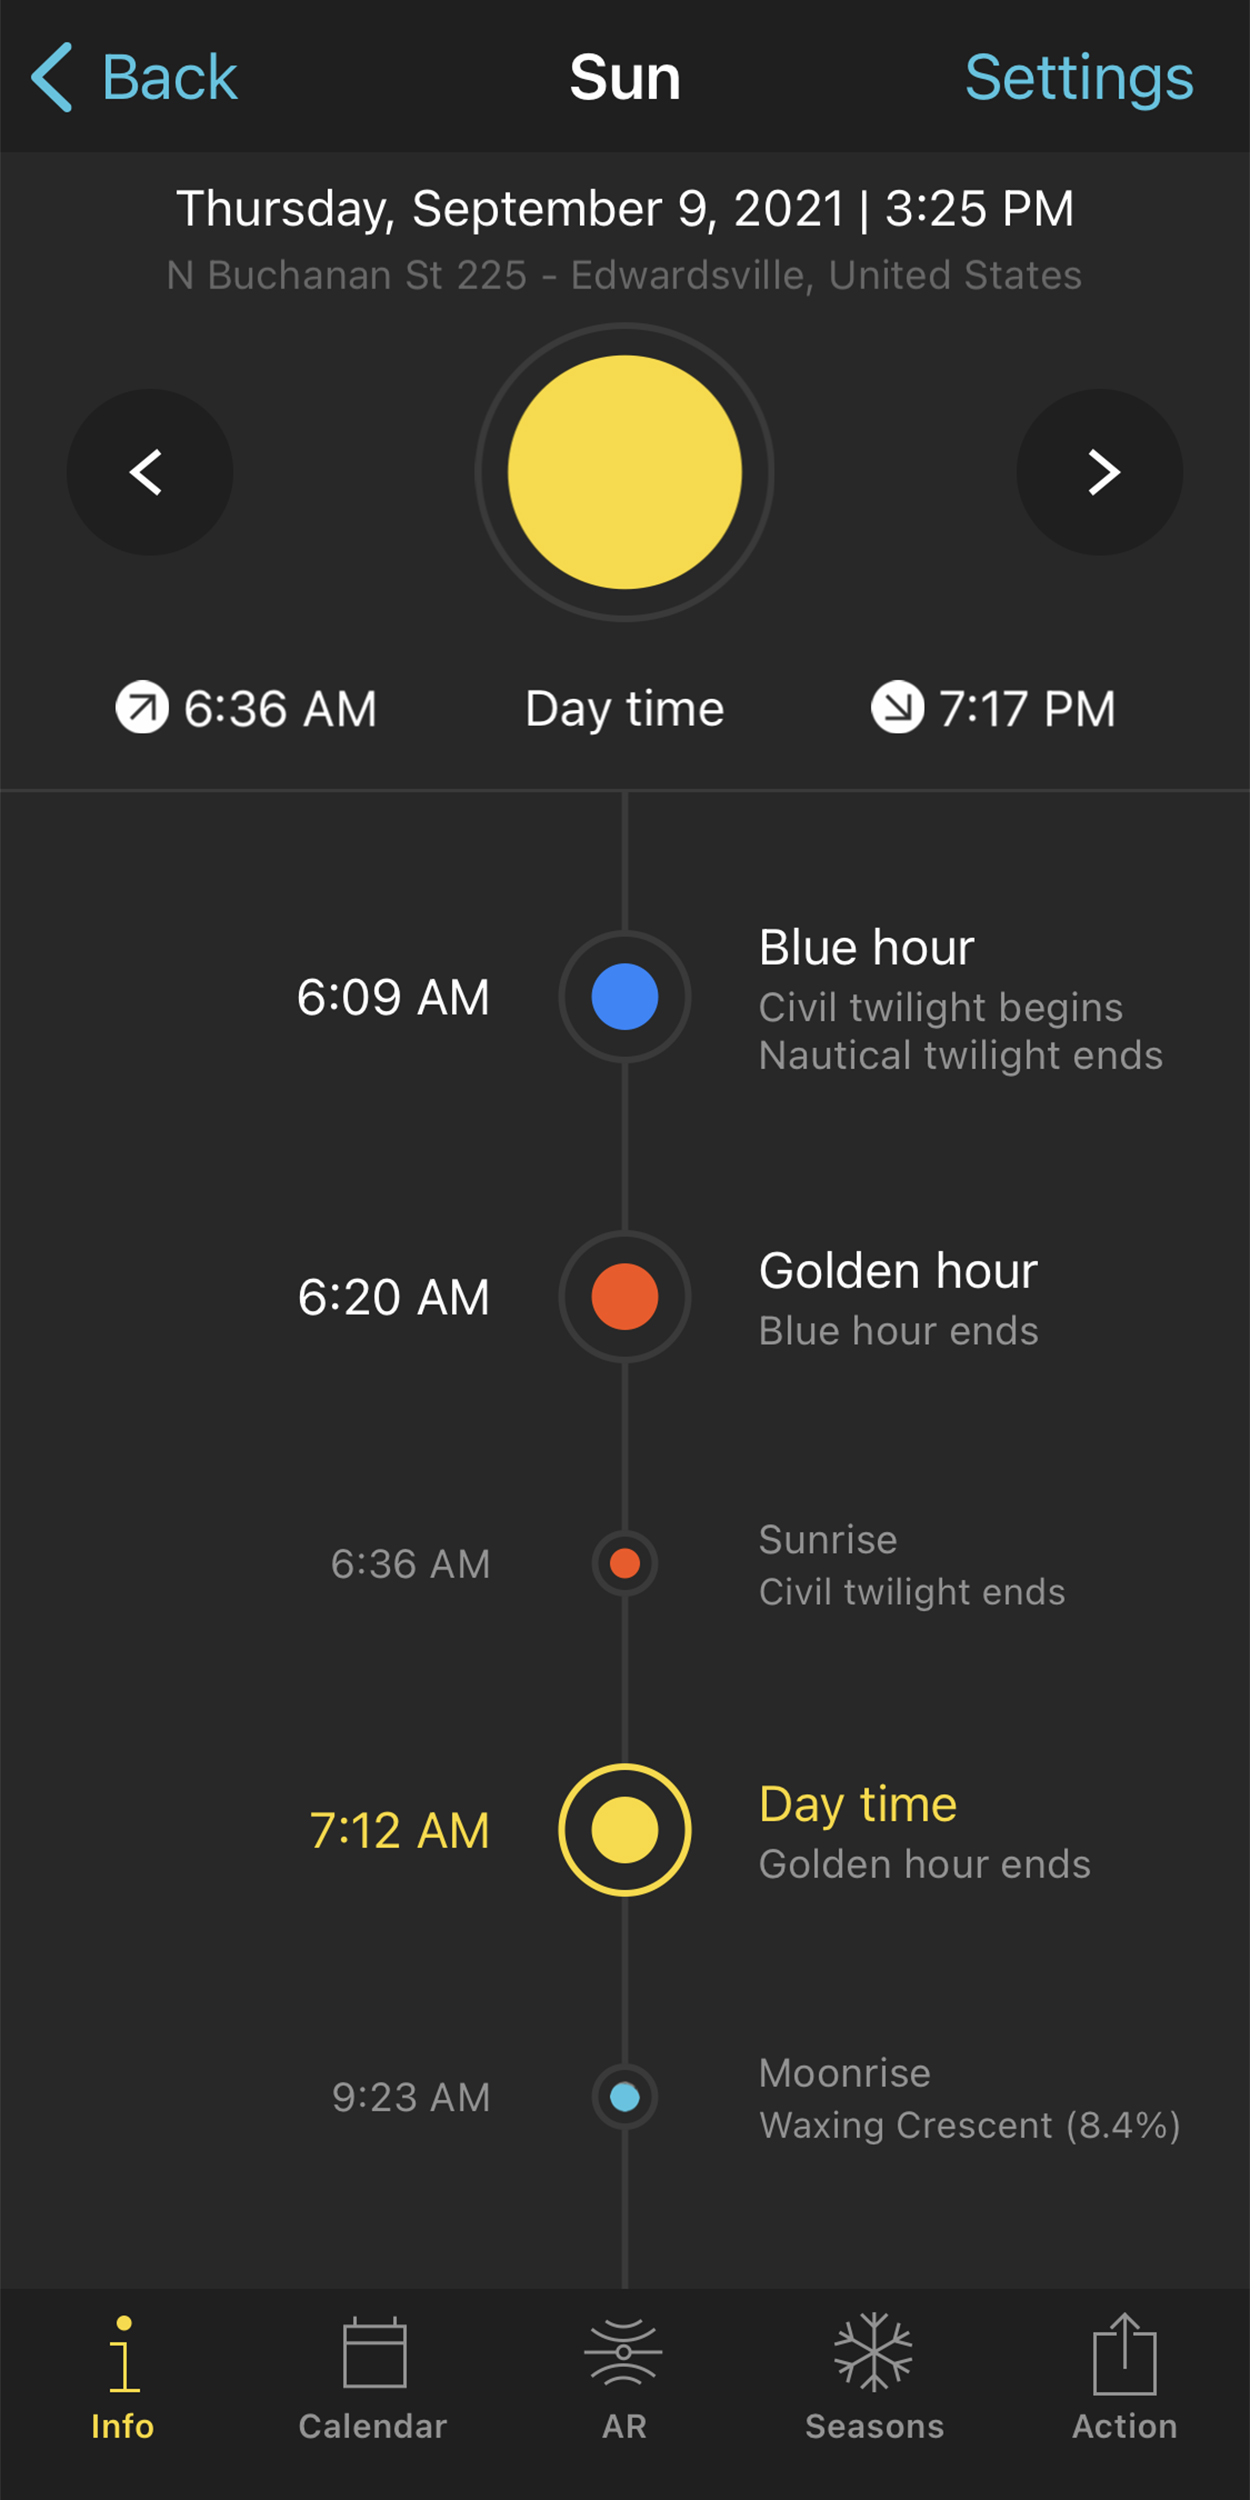
Photo by Jenn Mishra | Screenshot of Photopils app showing blue hour starting about one hour before sunrise.
Exposure is tricky during blue hour. The light changes quickly as the sun moves. Near sunset and sunrise, your camera settings may be closer to daylight settings. As the sun moves away from the horizon, your settings need to let in more light.
Use a light meter app like Photo Light & Exposure Meter (hyperlink: https://apps.apple.com/us/app/light-exposure-meter/id1297903210) or one of the semi-automatic modes like Aperture or Shutter Priority on your camera to help you figure out your exposure. For instance, use Aperture Priority mode at f/8.0 or f/11 (labeled A or Av). This will keep your scene in sharp focus even as your exposure changes with the changing light. Set your ISO to 100 and let your camera figure out the correct shutter speed.
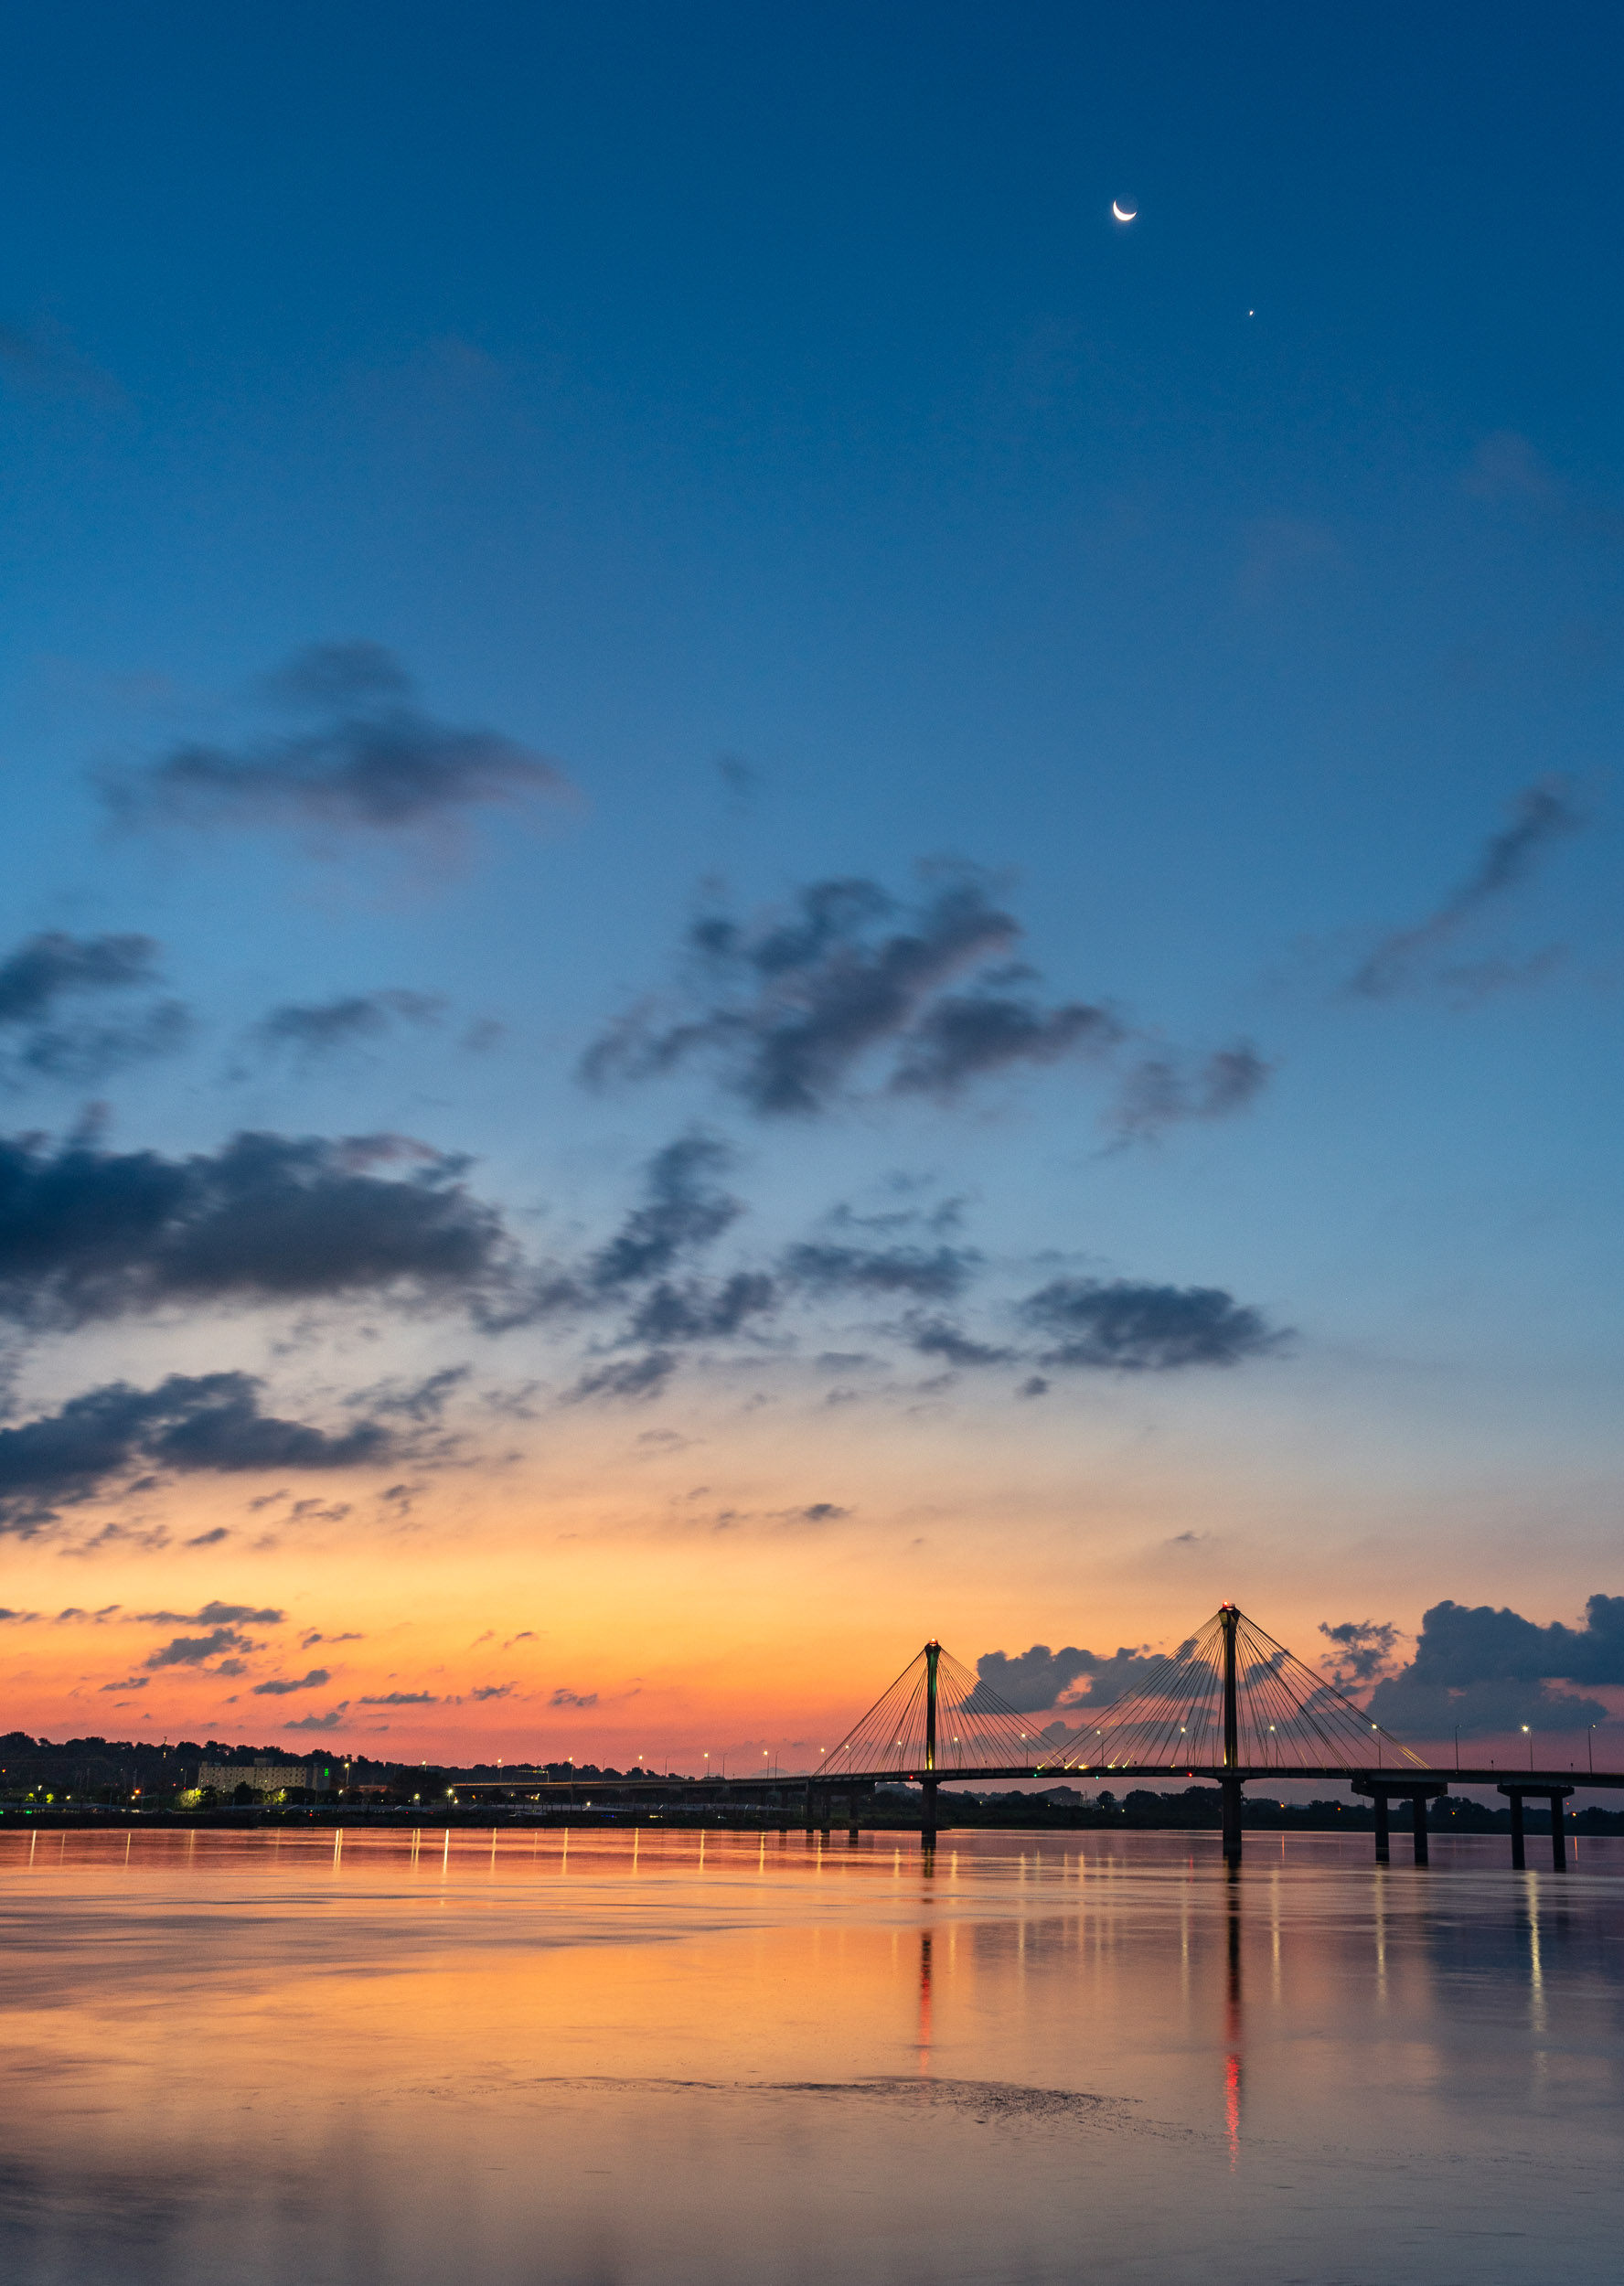
Photo by Jenn Mishra | Just before sunrise, the sun colors the sky moving from blue hour into golden hour. My settings were 6 seconds at f/11, ISO400.
In the darkest part of blue hour, your shutter speed will be longer than when the sun is near the horizon. If your camera is mounted on a tripod, it doesn’t matter what your camera selects as a shutter speed.
Blue Hour Camera Settings:
- Variable in Aperture Priority mode
- f/8-f/11
- ISO 100
Night Sky & City Lights
Including city lights or any type of artificial light in your image of a night sky will probably change your camera settings. Like the full moon, city lights can sometimes fool your camera. It will help to change your metering mode to center or spot metering. This tells your camera not to worry about the overall light in the entire scene. Put your center or focus point on the bright lights of the city.
City scenes vary in how bright they are. You may be right next to a lamppost or shooting a cityscape from miles away. The city may be large and made up of lots of individual light sources. Or you may be photographing only a few points of light. Use a light meter app or one of the semi-automatic modes like Aperture or Shutter Priority on your camera to help figure out your exposure. If you want to include motion blur, like light trails from cars, use Shutter Priority mode. Depending on how much movement there is in the scene, set your shutter to between 10 and 30 seconds.
If you don’t have a tripod in the city, use something stable like a railing or post to stabilize your camera. When the city is brightly lit, increasing your ISO will speed up your shutter speed enough that you may be able to comfortably handhold your camera at night.
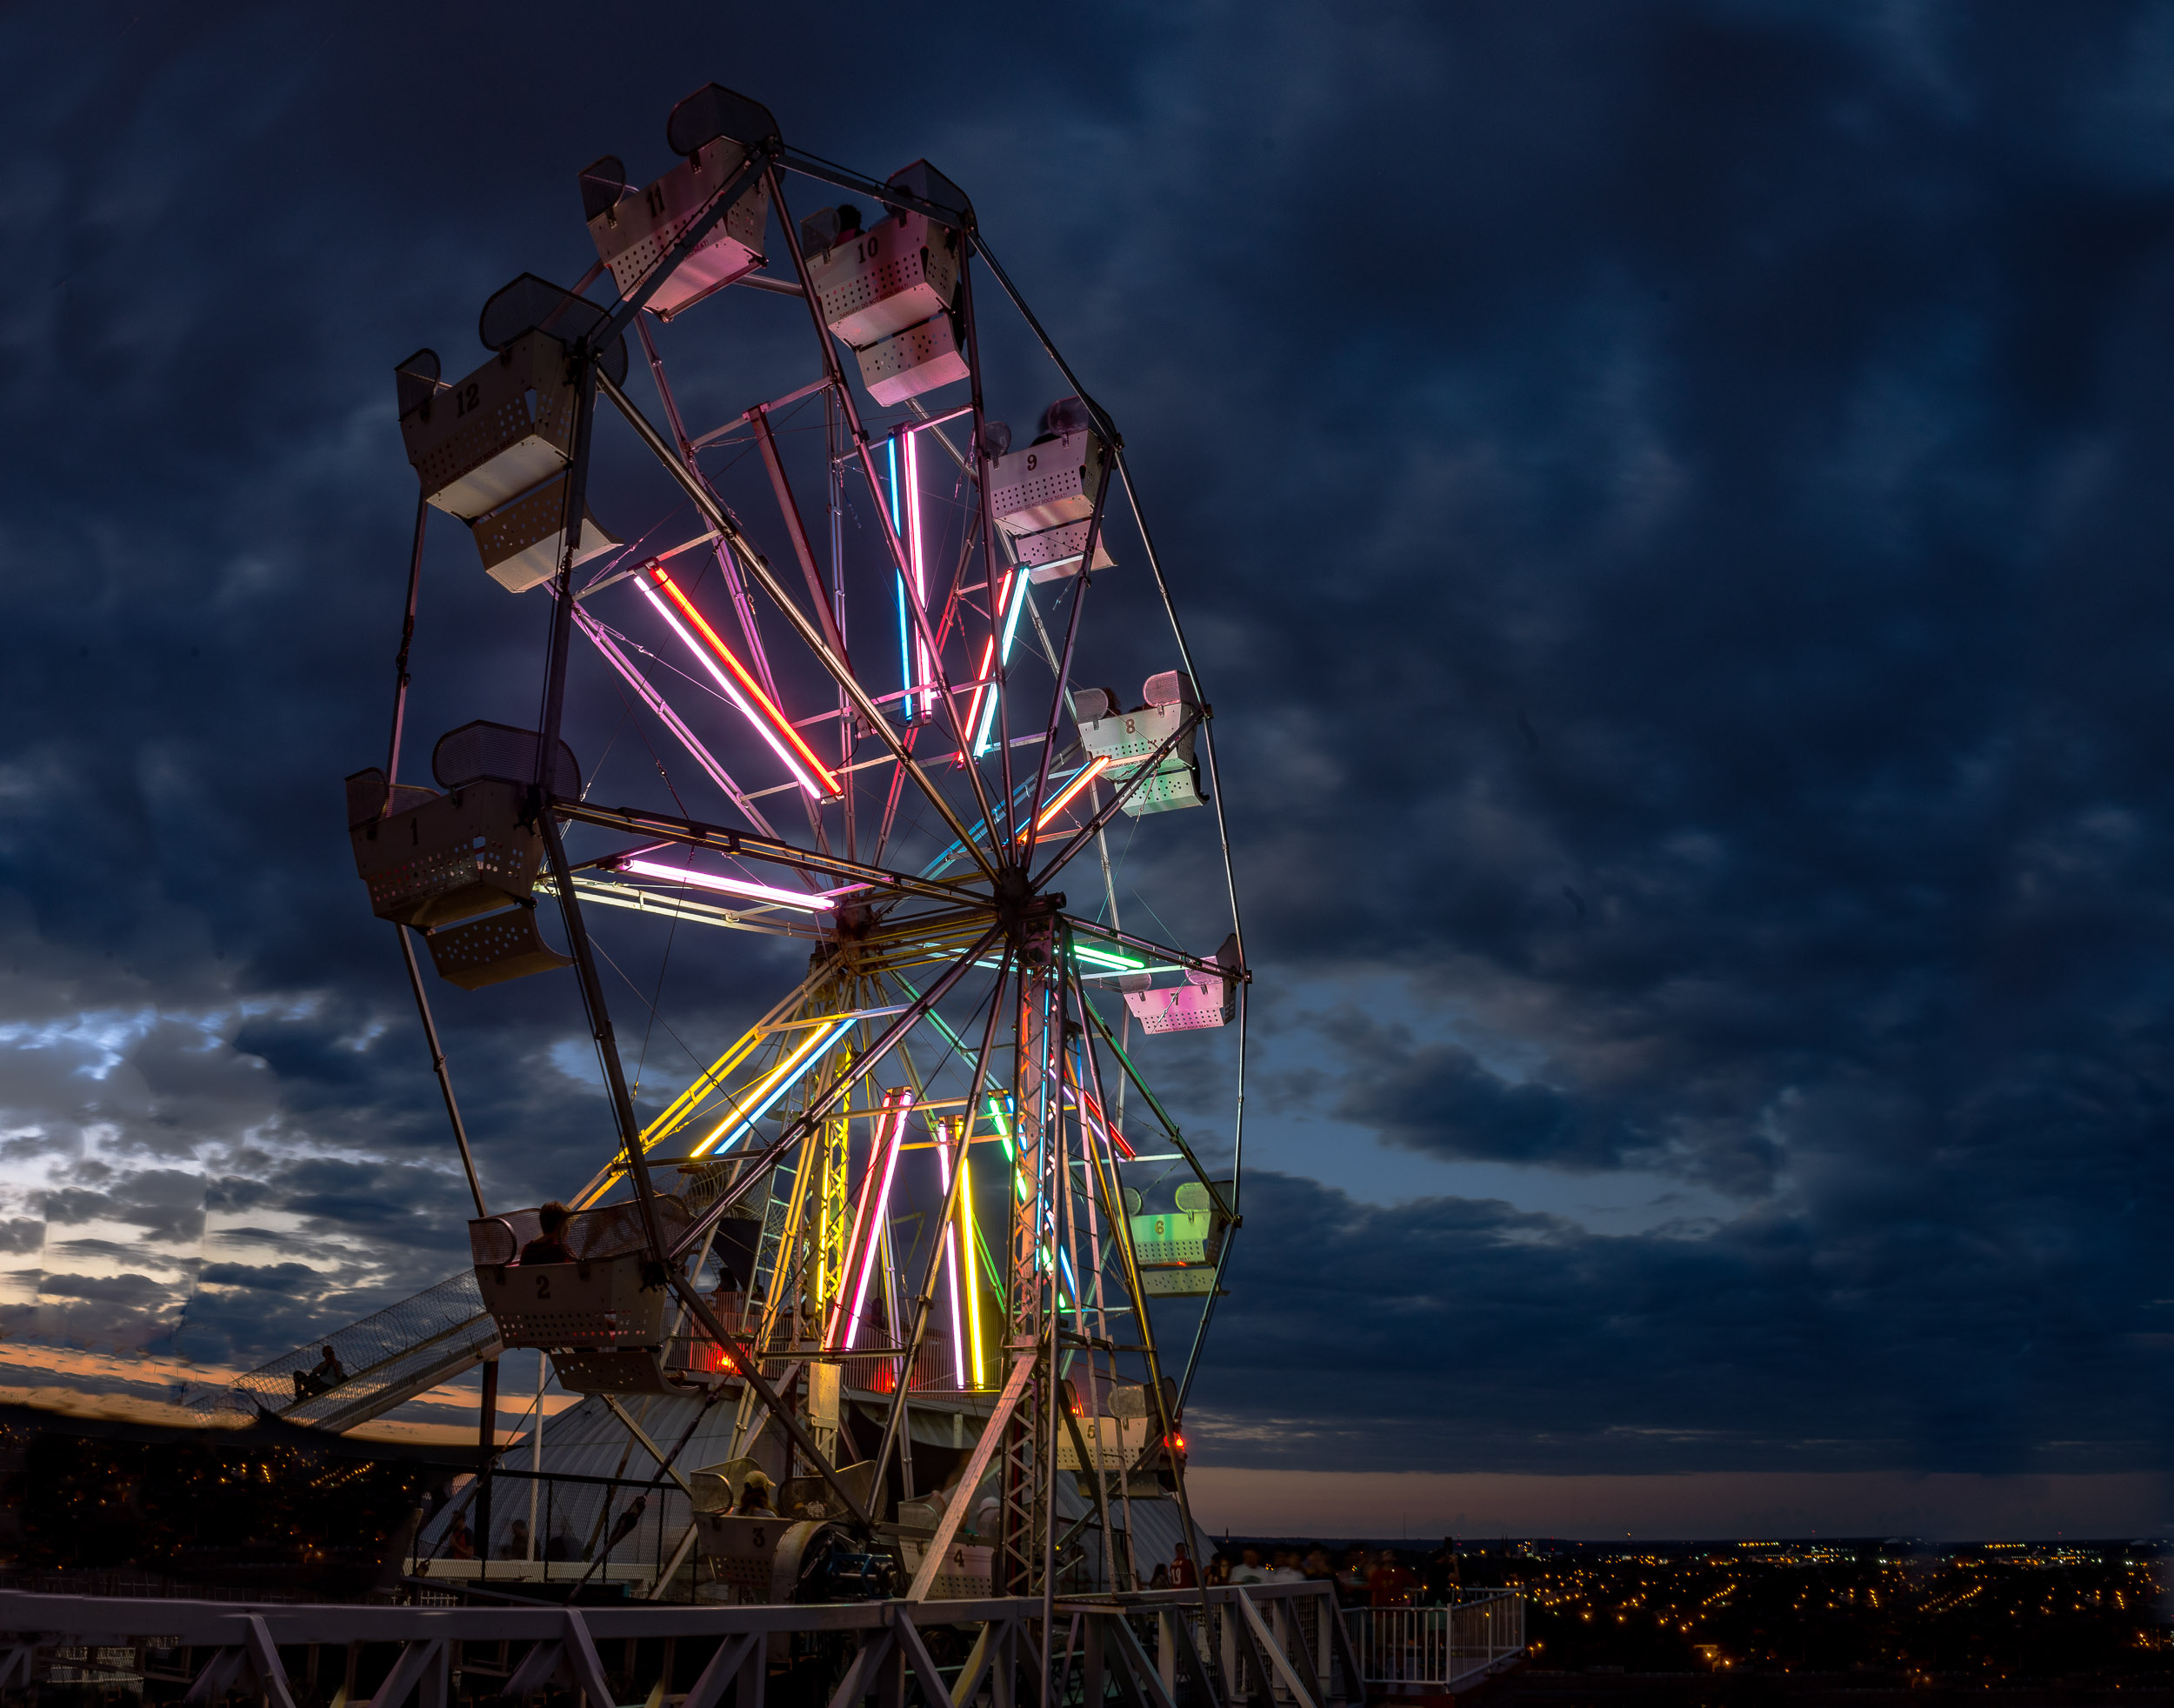
Photo by Jenn Mishra | Night sky captured behind a rooftop ferris wheel. The lights of the were bright enough that my settings were 3.2 seconds at f/16, ISO100.
City Lights Camera Settings:
- 10-30 seconds
- Variable in Shutter Priority mode
- ISO 100 (or auto)
Photographing Fireworks
Like the full moon, fireworks are brighter than you think. If you let too much light into your camera, the fireworks lose their brilliant color and become white streaks. Choose the sharpest lens aperture, usually between f/8.0 and f/11 on most lenses and ISO 100. Vary your shutter speed depending on how long you want the light trails to be. If you want to capture that initial burst, use a shutter speed of around 2 to 4 seconds. Lengthen your shutter speed to 6 or 8 seconds to capture longer light trails and multiple bursts. You probably don’t want to go any longer. Firework shows often conclude with a bright finale. At that point, speed up your shutter to 1 second.
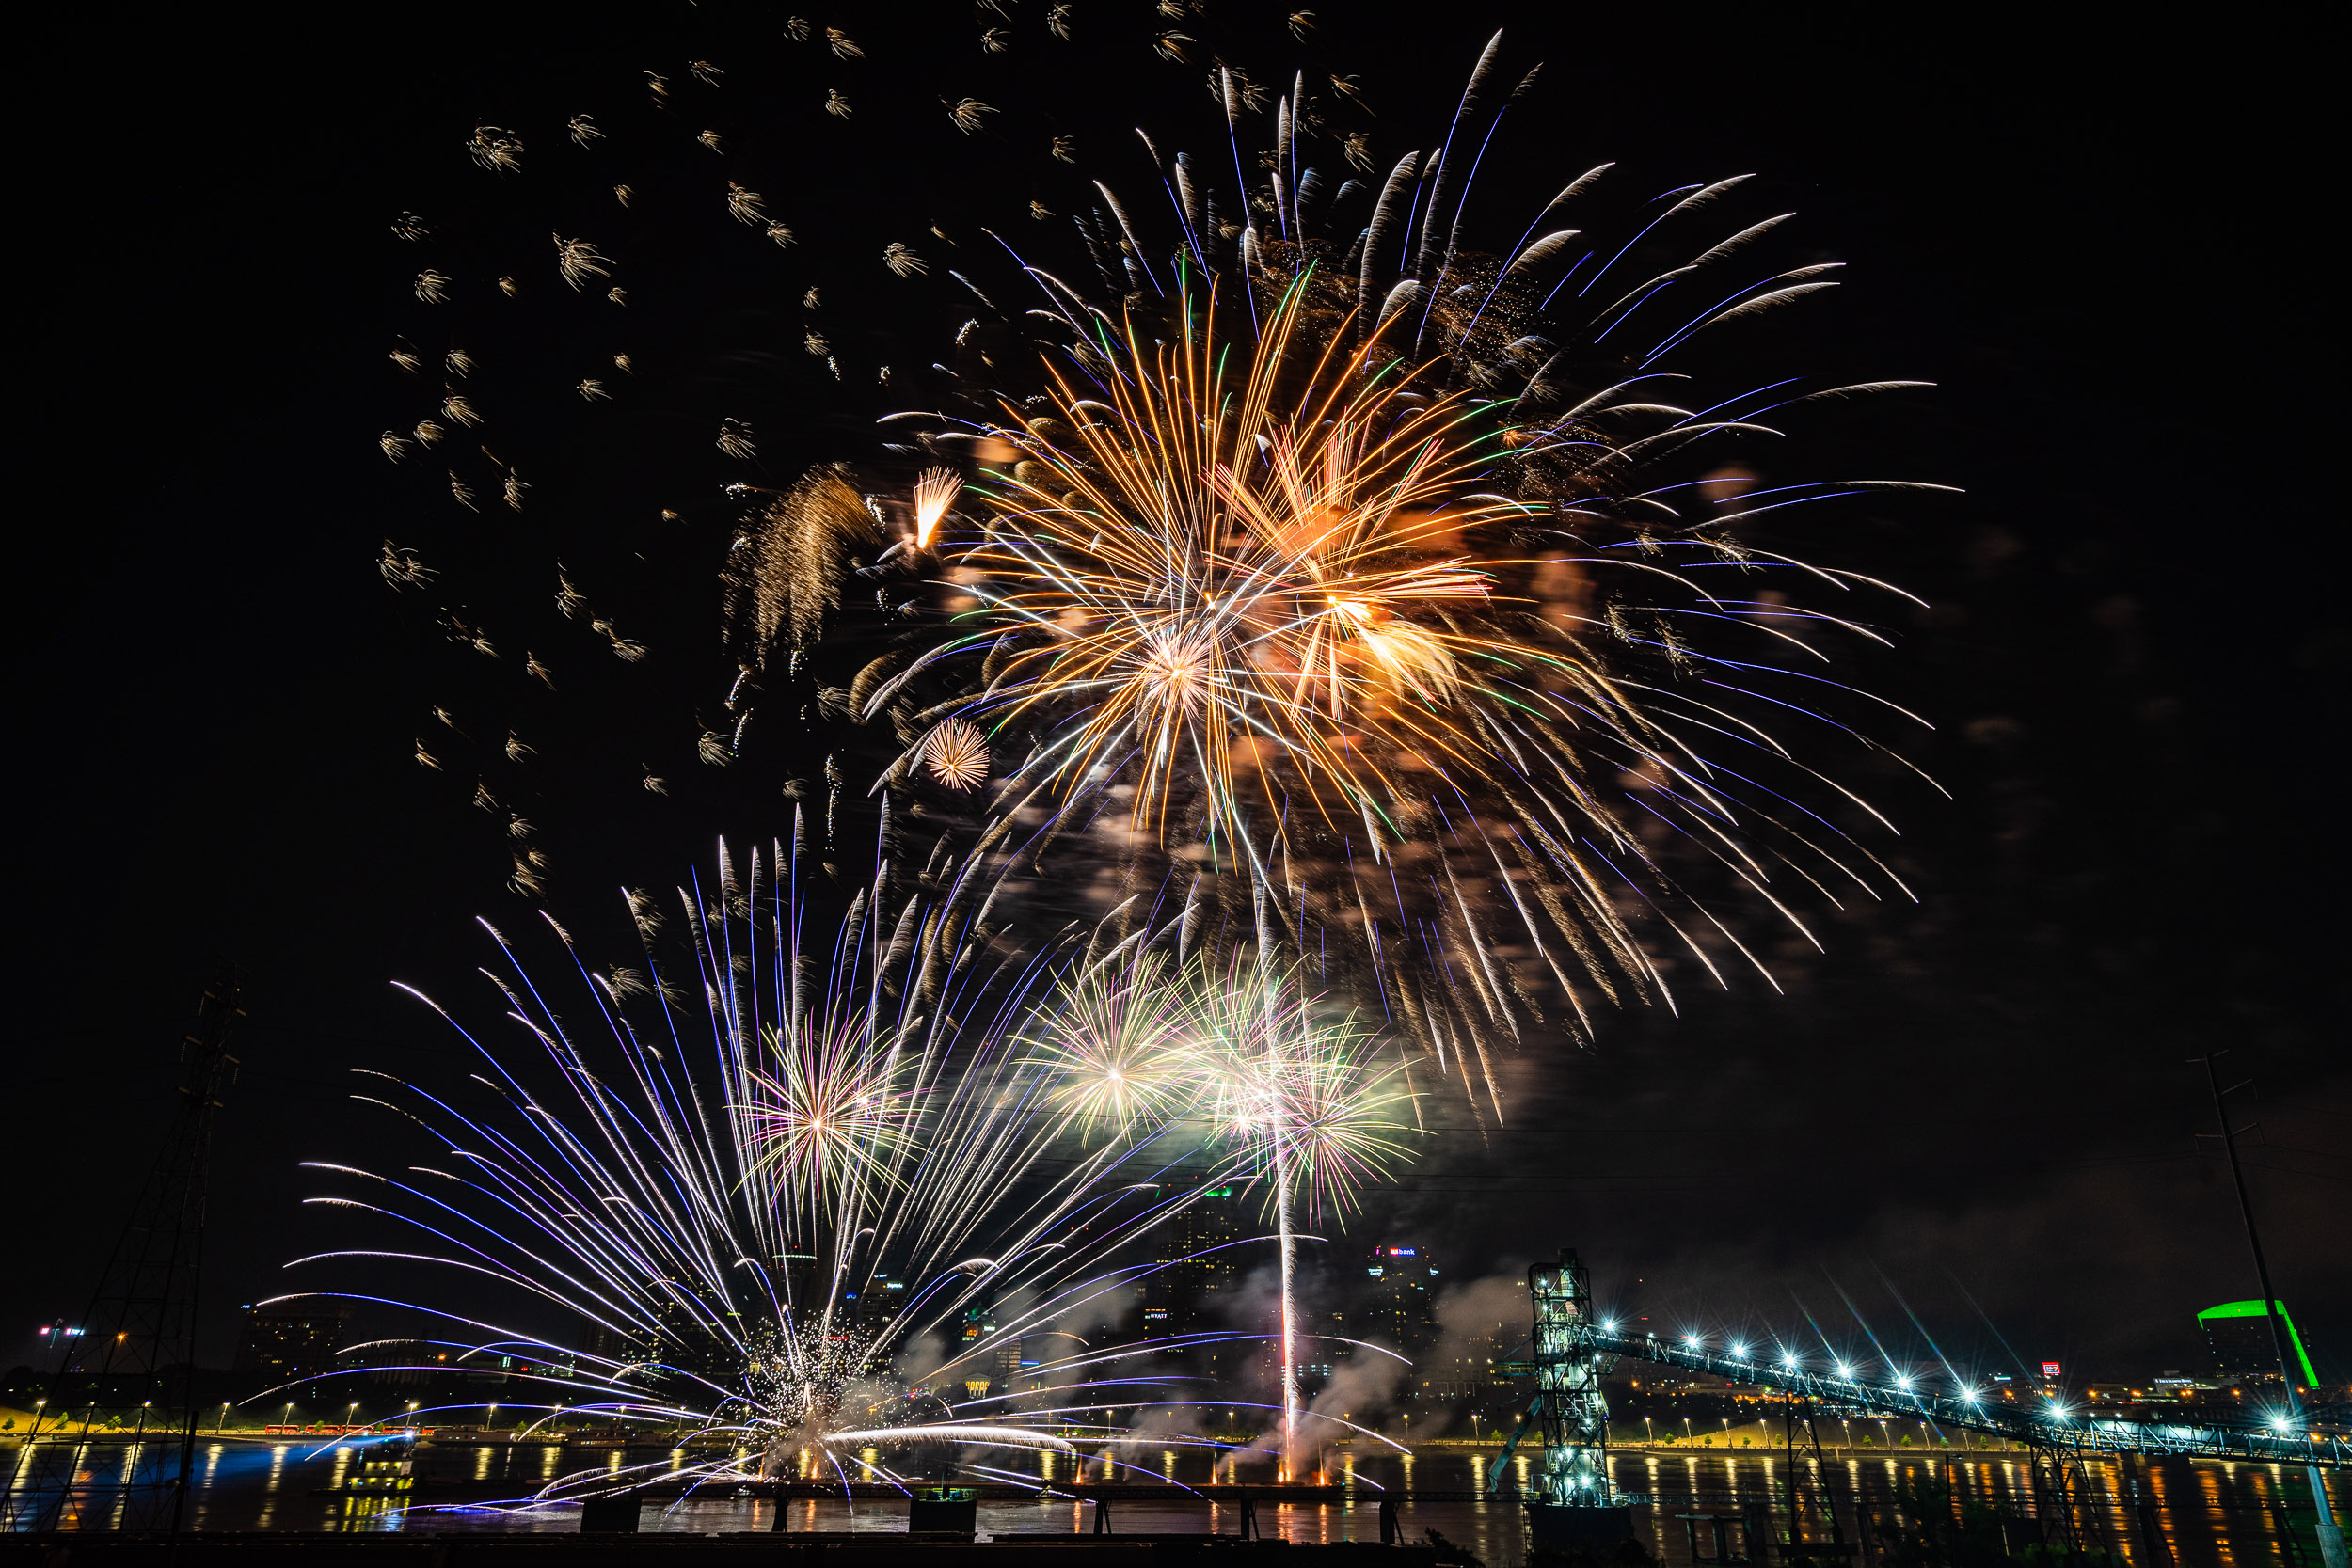
Photo by Jenn Mishra | Independence Day fireworks over the Mississippi River. My settings were 2 seconds at f/11, ISO100.
Fireworks Camera Settings:
- 2-8 seconds
- f/8-f/11
- ISO 100 (or auto)
Conclusion
When taking photos at night, you will need to change your camera settings to let in more light. But how much light depends on the type of night photography. If there is a lot of light in the scene, like when taking pictures of the full moon, your camera settings are more like daytime shots. Most night shots aren’t as dark as you think. Lights from the city can be bright and around sunset and sunrise, there is still some light from the sun. Even when you are photographing dark skies and the Milky Way, you need to strike a balance. To let more light into your camera, use a wide aperture, raise your ISO, and choose a slow shutter speed that won’t blur the stars.
Notice that in none of the night photography situations is your camera collecting as much light as it could. Your apertures are not wide open, and your ISO isn’t high. Your shutter speeds may not be that long. The night sky isn’t as dark as you think.
Cover Photo by Jenn Mishra