The Rule of Thirds is one of the first composition rules most people learn about in photography. It’s a fundamental composition rule but, like all rules, isn’t appropriate in all situations and is sometimes made to be broken! The Golden Ratio (also known as the Fibonacci Spiral) could be seen as the next step on from the Rule of Thirds, so I decided to talk about both of these in this guide, which should give you some helpful tips for photographic composition.
Here’s what we’ll cover:
- What is the Rule of Thirds?
- When should you use the Rule of Thirds?
- When should you break the Rule of Thirds?
- What is the Golden Ratio?
- How to use the Golden Ratio in photography.
- A quick post production tip!
What is the Rule of Thirds?
The Rule of Thirds is one of the fundamental composition rules. The basic tenet is that a photograph can be broken down into thirds, both horizontally and vertically, in order to produce a balanced shot. The key is to imagine a grid overlayed on your photograph, like this:

As you can see, the above diagram gives us nine sections as well as four intersecting points. The idea is to place the important elements of your image at these intersecting points so that they form points of interest. Placing objects at these points draws a viewer’s eye to them and helps to strengthen the impact of an image. By the way, some cameras actually have a Rule of Thirds grid that you can overlay on your LCD screen as a training mechanism.
When should you use the Rule of Thirds?
The Rule of Thirds is a very useful composition tool when you’re starting out, particularly for landscape photos. Using the Rule of Thirds can be a simple way to shoot a well-proportioned landscape. Shoot with a third of sky, a third of horizon and a third of foreground to give you an image that looks balanced and natural. Use the intersection points to place any objects within your landscape (for example, a tree) to create your point of interest and direct your viewer’s gaze.
Key Lesson: Because the Rule of Thirds is so strongly associated with landscapes, people often don’t consider using it for portraiture. But it can be an equally useful teaching tool for shooting portraits. Although it’s very common to place your subject in the centre of the frame when shooting portraits, equally strong portraits can be created by using the Rule of Thirds. Place your subject’s face along one of the vertical lines and try to place your subject’s eye (the one closest to the camera) at an intersection point. Why does this work? Well, a strong portrait creates a connection for the viewer with the subject’s eyes, meaning that is the first thing they’ll look at in a portrait.

Photograph by Brad Mills
https://unsplash.com/photos/9sgdhwtLOR8
This is a class Rule of Thirds shot landscape wise, although the figure adds a touch of the Golden Ratio to the shot!
When should you break the Rule of Thirds?
There’s some argument in the photographic world about whether the Rule of Thirds is useful or not. Personally I believe it’s a brilliant tool for those starting out with photography – particularly for learning how to shoot balanced landscapes.
But, of course, like most rules it’s made to be broken! Using the Rule of Thirds isn’t always appropriate and, if you only shoot using this rule you could end up curtailing your creativity. Take landscapes, for example. If you’re shooting at sunrise or sunset, it’s likely that the dramatic colours of the sky will be your focus. And much of the foreground is going to be in shadow. In situations like this, you wouldn’t want to follow the Rule of Thirds; you’d want to focus on the sky and use the foreground to add some definition and placement for your shot. And, as I already mentioned, when it comes to portraiture a central composition is often the strongest. Plus portraits shouldn’t necessarily be contained by the exact specifications of the Rule of Thirds.
Always shoot the shot you think looks most appealing!

Photograph by Garth Pratt
https://unsplash.com/photos/3YfSwCfJ6Do
This shot is a great example of using the Phi Grid.
What is the Golden Ratio?
You can think of the Golden Ratio as the Rule of Thirds’ big brother. The spiral that it creates is the result of some complex maths – a/b=(a+b)/a = 1.61803398875 (usually rounded to 1.618 in case you’re interested or mathematically inclined! However, you don’t need to remember the equation as you can find overlays on the internet, or even in editing programmes such as Lightroom.
The law was discovered by Leonardo Fibonacci (hence the Fibonacci Spiral) around 1200 A.D. Fibonacci noticed that there was an absolute ratio that often appears throughout nature and is a sort of design that appeals to the human eye. Artists and architects over the centuries have used the 1:1.618 ratio when designing their work, and you’ll see its influence in famous works of art such as the Mona Lisa through to modern designs such as those used by Apple and Twitter. But, because it’s an advanced composition technique, it’s not often discussed in the photographic world.
However, the Golden Ratio is well worth getting to grips with! It’s perfectly balanced and this balance makes it attractive to a viewer. In photography, it identifies the main subject, whilst also leading the viewer through the entire image.
How to use the Golden Ratio in photography
What does the Fibonacci Spiral look like? Here’s a basic illustration to help you visualise it:
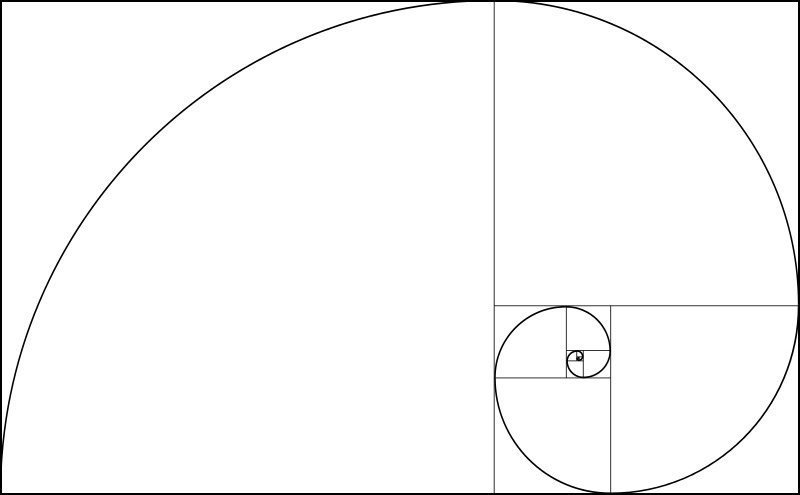
Don’t panic – it’s actually simple to use! Simply place a point of interest at the smallest part of the spiral and this will allow a viewer’s eye to flow through the rest of the image. Note as well that you don’t have to use the spiral in this direction. You flip it or turn it vertically. What’s important is the shape and distance between the loops.
Some people find it easier to visualise the spiral as a grid. The Phi Grid, which represents the Fibonacci Spiral in grid form, is similar to the Rule of Thirds grid, which I’ve overlayed here:
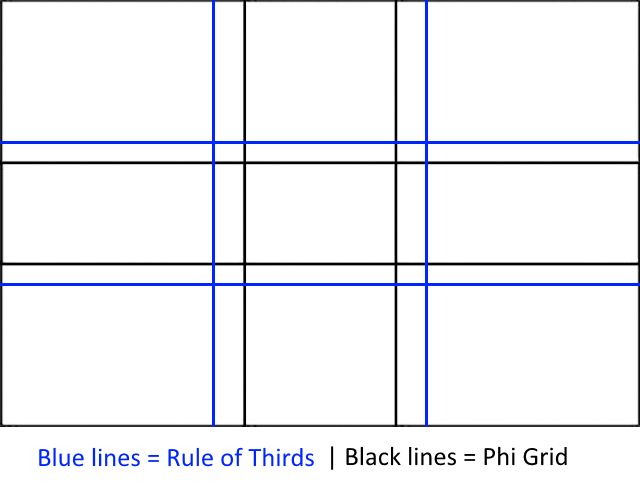
The grid is formed by taking the sweet spot of the Fibonacci Ration and recreating it four times into the aforementioned grid. But whereas the Rule of Thirds Grid is 1+1+1, the Phi Grid is 1+.618+1.
I find that the grid is easier to use for landscapes, whereas the actual spiral works well with portraits, where you can place the subject’s eye in the smallest part of the spiral.
A quick post production tip
If you work in Lightroom, you can quickly access a Rule of Thirds overlay by pressing ‘R’ on your keyboard. You can also access a Golden Ratio overlay under the ‘R’ button. This opens your cropping functions and you can then cycle through the available overlays by hitting ‘O’ on your keyboard. There are eight variations to choose from – note that you can change the direction of the Fibonacci Spiral by pressing ‘Shift + O’.
In conclusion
Composition rules are an important step in learning about photography and improving your imagery. And taking the Rule of Thirds a step further with the Golden Ratio technique will help to improve the creativity of your images even further.
Self-help quiz
- What should you use the intersection points for in the Rule of Thirds grid?
- Name a time of day when using the Rule of Thirds isn’t appropriate?
- Who discovered the Golden Ratio?
- What is the Golden Ratio grid known as?
- How do you access the Rule of Thirds and Golden Ratio overlays in Lightroom?