If you think you need expensive cameras with interchangeable lenses to make great photographs, think again. You probably have all you need in your pocket. Many mobile phone companies have upped their game when it comes to digital cameras. Starting with iPhone X, the camera has become a major selling point of each new version.
Let’s look at some of the features of the iPhone camera that will help you make great photos. Some of these features are obvious. But we’ll cover some of the many hidden tools in the iPhone camera app that will make you look like a pro.

Photography by Jenn Mishra | Selfie taken with iPhone in a reflective work of art
Introducing the iPhone Camera App
The iPhone camera app is deceptively simple. Open the app and click the large shutter button. There is no need to worry about exposure settings or focus. The camera takes care of it all. But there are some powerful features packed into the app. In this article, we’ll talk about many of the icons shown on the screen.
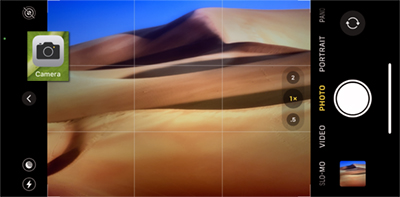
By Jenn Mishra | Open the native camera app on your iPhone to get started
At the top or left side of the app are modes and filters including, Flash, Night, and Live Photo. Select a lens using the numbers on the bottom or right side of the image from an ultra-wide-angle (.5) to telephoto (2). Below or to the left of the image, select the type of image you want to make. A still photo is a default, but you have many different options including, Portrait, Video, and Panorama.
A large shutter button sits at the bottom or the far right. The shutter button is not always convenient in this position. You can use the volume buttons on the phone or on your headphones to activate the shutter button. Finally, the selfie button switches to the cameras facing you.
Let’s explore how these features can help you make great photos. We’ll start with one of my favorite modes: Live Photo.
Live Photo: Capturing the Moment
Live Photo is a cross between a still photo and a video. These are photos that move. But there is more to Live Photo than capturing a snippet of video. Apple introduced the feature with iPhone 6S in 2015. Even though it has been around for many years, most photographers do not go beyond the initial cool factor. It is a powerful tool that goes beyond what most professional cameras can do.
The Live Photo icon looks like a circular target. A line through the icon means the feature is off, and you will capture a still image. Tap the icon to turn on Live Photo.
In Live Photo mode, your iPhone captures 3 seconds of video. Half before you snap the photo and half after. This is completely mind-blowing! Your camera starts recording before you told it to take a picture.
Live Photo helps you capture the moment. Your child scores a goal and then does a happy dance. A butterfly lands on a flower then flies away. You see it and react, snapping a photo, but not always fast enough. With Live Photo, there is a greater chance that you captured the magic moment. The AI in your iPhone chooses the best frame from the sequence of images. But you can be the judge.
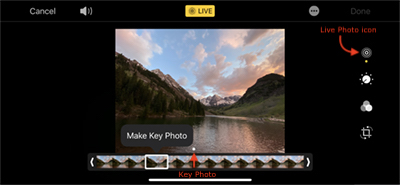
By Jenn Mishra | Edit Live Photo to see the 3 seconds of video taken before and after the shutter click. Your iPhone has chosen one frame as the key photo. You can change the key photo by moving the rectangle to another frame
Click on a Live Photo. The target icon appears in the corner of photos shot in Live Mode. Also, your iPhone creates a Live Photo album for all these action shots. Select Edit and click the Live icon.
A video timeline appears. One frame is highlighted with a rectangle and a dot. The dot indicates the key photo. This is the one that your camera thinks is the best. Slide the rectangle left and right to see the 3-second video unfold. If you find a frame that you like better, make this your key photo.
With Live Photo, you’ll never take a photo of someone with their eyes closed or miss a priceless moment. But this isn’t everything that Live Photo will do. Let’s look at Live Photo Effects, especially the long exposure effect.
Create Long Exposure with Live Photo
Photographers often create long exposures for artistic effect. When the camera’s shutter is left open, movement in the scene blurs. This smooths choppy water and blurs clouds. The difficult part, especially during the day, is that too much light hits the sensor. The image is too bright. With a dedicated digital camera, photographers need a tripod and neutral density filters to create long exposures. Long Exposure is one of the Live Photo Effects that you can do without all this equipment.
The effects are hidden. Open a Live Photo. Hold and swipe up to reveal the effects.
The Long Exposure effect blends the series of images created in Live Photo. If your iPhone was not on a tripod, the image includes only the parts of the image visible in all frames. This usually results in some cropping. Photographers can make images longer than 3 seconds and smooth the water further. But your iPhone will give you a good start on the long exposure look.
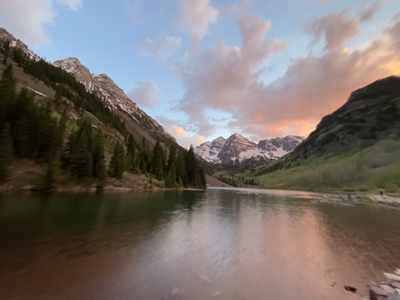
Photograph by Jenn Mishra | Long Exposure of Maroon Bells in the Rocky Mountains created using Live Photo mode on an iPhone 11pro. Compare with the choppy water in the previous screenshot
Take Low-Light Photos at Night
Apple introduced Night Mode in iPhone 11. It is a form of long exposure that brightens a dark scene. In Night Mode, your iPhone opens the shutter for a few seconds to collect more light. The longer the shutter is open, the more light gets into the camera. The Night Mode icon only appears if you are in a low-light situation. This is the signal that your camera does not have enough light to take a well-exposed photo. Tap the icon to reveal a slider that lets you control how long the shutter is open.
Dedicated digital cameras also use open the shutter longer to let in more light. But they need to be on a tripod to avoid camera shake. Your iPhone is much better at compensating for camera shake. This lets you take photos at night without a tripod.
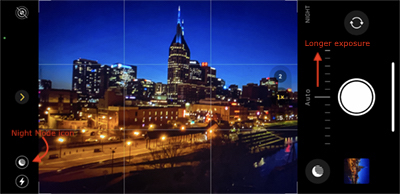
By Jenn Mishra | Photo of Nashville skyline at night taken with an iPhone 11pro. The phone selected a high ISO of 1600 and opened the shutter for 1/15th of a second
Photograph with Style using Filters
The iPhone camera app comes with a large set of photo editing tools. Click on a photo and select Edit. You can change features like exposure, contrast, saturation, white balance (warmth), and sharpness. You can also reduce noise and add a vignette. Select the Auto button. This looks like a magic wand. Let the AI in your iPhone do most of the work. The crop tool straightens the horizon, changes the perspective, or lets you select an aspect ratio. If you don’t like your edits, click Revert to go back to the original image.
The iPhone app lets you individually adjust elements in your picture. But filters apply a professional style to your images. Select the Filters icon in the center and choose your style. Maybe you want rich, warm colors or a cooler look. You can even select from a set of black and white filters.
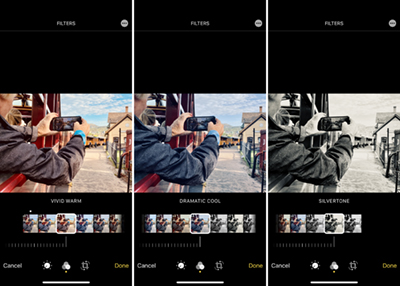
By Jenn Mishra | Compare the results of three different filters: Vivid Warm, Dramatic Cool, and Silvertone
The basic iPhone camera app has many powerful tools to change the look and feel of your image. But what you might not know is that you can apply many of these styles to your photos when you take them.
On the camera app, click the carrot in the top center of your frame. This opens a set of tools like aspect ratio, exposure, delayed timer, and filters. There is no need to post-process the image later. Take the picture in the style you want. This saves photo editing time, and you can send your image directly to Instagram.
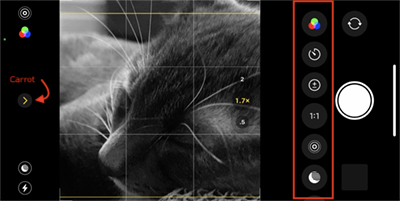
By Jenn Mishra | Click the carrot on the top or left of your screen to open a shooting menu. Here, I’m photographing my kitten in black and white with the image already cropped for Instagram
Freeze Focus and Exposure
The newer iPhones are programmed to recognize and lock focus on faces. This includes animal faces. A yellow rectangle identifies the place where the focus is locked. This is a prized feature on mid-to-high-end digital cameras as the face and eyes are the best places to focus on in the scene.
You can lock focus wherever you would like in the scene. Simply tap where you want the focus to be. The yellow square moves to that point. The camera will also lock exposure on this point. If you want to make the photo lighter or darker, tap and slide up or down to adjust exposure.
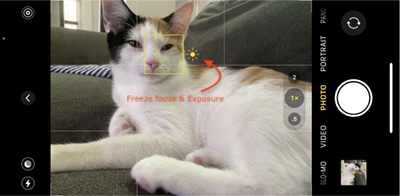
By Jenn Mishra | A yellow square shows that focus and exposure are locked on my cat’s face
Tap on strong lights, like the sun, to create a well-exposed photo.
Shoot it Wide
Starting with iPhone 11, you have three lenses to choose from. The 1x lens, a telephoto lens, and an ultra-wide angle. I often use the wide-angle lens on my iPhone even if I have my professional camera with me. You can get ultra-wide-angle lenses for digital cameras, but they are specialty lenses and very expensive.
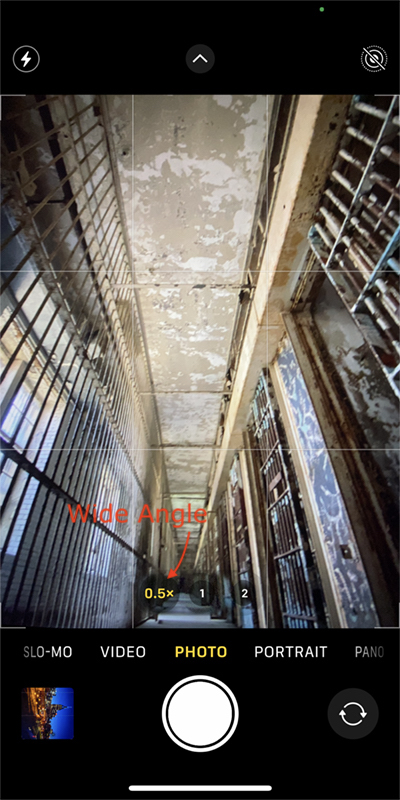
By Jenn Mishra | Click .5 to select the ultra-wide-angle lens
Use the ultra-wide-angle lens when you are in close quarters, or to emphasize lines moving away from the camera. The lens will make the elements closer to the camera seem larger.
Wide-angle shots give you a different perspective on the scene. This is wider than your eye normally views the world, so it adds visual interest. The lens does not include a distortion like that found on fish-eye lenses, but the results can look different from reality, especially if strong lines are leading away from the camera. To enhance this distortion, hold your camera low. Even the most mundane scenes can look epic.
Video, Slo-Mo & Time-Lapse
So far, we have focused on capturing still images. But your iPhone does so much more. The newer iPhones shoot 4K video. Move the slider above the shutter button to video. Or click and hold the shutter button to temporarily switch the camera into video mode. Hold for as long as you want the video to record. Slide to the right to lock the video. Send your video straight to iMovie for more advanced editing by clicking the three-dot icon in the corner.
But don’t just stop at video, explore the Slo-Mo and Time-Lapse options. These allow you to make professional-looking videos. The slow-motion option adds an element of drama to your videos. You can edit the video to change where the slow-motion happens.
Time-lapse is a video made up of a series of still photos separated by time. Photographers use time lapses to show a storm rolling in or light changing during sunset. You can show the construction of a building, a city street scene in flow, or a flower blooming.
Time-lapses work best if you mount your iPhone on a tripod so that the stable parts of the scene do not move. Select the Time-Lapse option, click the shutter, and let the camera do its thing. The iPhone figures out how many images to take and how much time to leave between images based on how long you choose to record the time-lapse. There are 3rd party apps like Skyflow that let you have more control over your time-lapse.
In the end, you will have a video that looks like you took it with a professional-level camera.
By Jenn Mishra | Screenshot showing time-lapse shutter dial
Portrait Mode
Portrait Mode came in with iPhone 7 in 2016 and has improved with each generation. Portrait mode adjusts two key features that make portraits look more professional: lighting and depth of field. Portrait photographers often use a shallow depth of field. This means that the background blurs. This helps the subject stand out. Portrait Mode is designed to photograph people, but it works on other types of subjects, too.
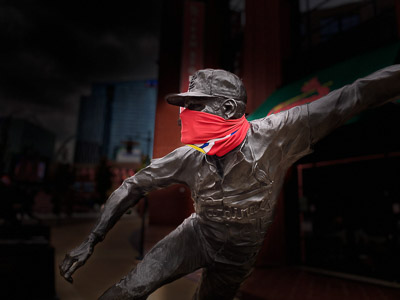
Photograph by Jenn Mishra | Experimenting with stage lighting in Portrait Mode on a statue near the ball park in St. Louis
You have the option of choosing natural light or simulate studio or stage lighting. Click the “f” icon to adjust the depth of field. Lower the f-stop for a more blurred background. The background will be more in focus at a higher f-stop.
You can also change the lighting and depth of field later during editing. Select a photo taken in portrait mode and click Edit. You will see a lighting icon next to the other editing options along the bottom or right side. On the top are two additional icons. One allows you to adjust the brightness of the light. The other lets you adjust the depth of field. The smaller the number, the shallower the depth of field.
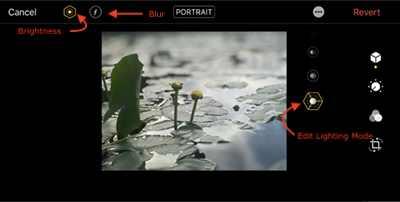
By Jenn Mishra | You can change the lighting, brightness, and blur of a photo taken in Portrait Mode
Other Camera Apps
The iPhone’s default camera app is powerful, but it is not the only game in town. Other apps are available through the App store. Adobe’s Lightroom Mobile app is free to use even if you do not subscribe to the desktop version of the program. This app lets you take raw images in HEIC format. Raw files collect more information than JPEGs. This allows you more flexibility in photo editing.
https://apps.apple.com/us/app/adobe-lightroom-photo-editor/id878783582
Apps like Yamera let you have manual control over your camera and Slow Shutter lets you take long and double exposures. AvgCamPro reduces noise in a low-light situation.
https://apps.apple.com/us/app/yamera-manual-camera/id951399974
https://apps.apple.com/us/app/slow-shutter-cam/id357404131
https://apps.apple.com/us/app/average-camera-pro/id415577873
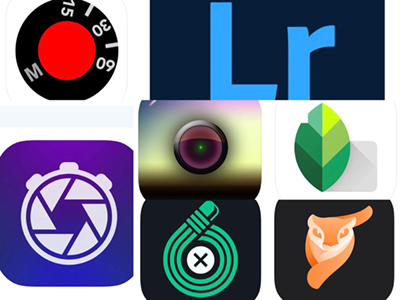
By Jenn Mishra | Explore the app store for programs that increase the functionality of your camera and edit your photos
In addition to camera apps, many quality post-processing apps let you change the look and feel of your photos. Snapseed is a popular photo editing app, and there are many specialized apps. Touch Retouch lets you remove people or objects from your photo. Motionleap adds animated visual effects, and Focos lets you add blur.
https://apps.apple.com/us/app/snapseed/id439438619
https://apps.apple.com/us/app/touchretouch/id373311252
https://apps.apple.com/us/app/motionleap-by-lightricks/id1381206010
https://apps.apple.com/us/app/focos/id1274938524
Conclusion
It is not the gear that makes great photographs. It is you! Your iPhone camera has all you need to make great photographs. At some point in this digital age of photography, we decided that the cameras on our mobile phones were inferior. To make great photographs, we needed expensive gear and dedicated cameras. Maybe the cameras on our phones were inferior at some point in the past. But no longer. Today’s phones include cameras, usually more than one, that surpass any of the early digital cameras. They are better than anything Ansel Adams had to work with.
Cover Photo by Widget Watch via Pixabay